Processes. People. Documents.
No code automation platform designed for compliance, HR, legal, operations, procurement, sales and sourcing teams.

We work with

PwC

NYC
Deloitte Legal

LexisNexis

Santander

Bronx DA

Vialto

Skoda

Societe Generale

Holland & Knight

UniCredit

Telia
...and over 400,000 others
Legito Workspace Brings Everything Together
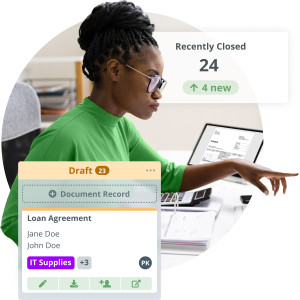
Controlled Document Flow
End-to-end document lifecycle management with automated routing, approvals, dashboards, collaboration and reusable data.
Rich workflow tools to power efficiency or growth. No-code rapid deployment for fast ROI. Regular new features.
Learn More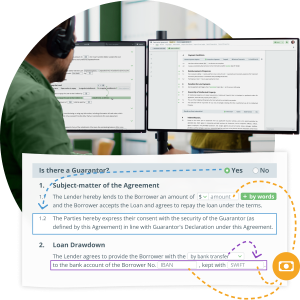
Document Automation Reinvented
No code, no limits. Easily automate even advanced documents. Unique interactive documents that leverage inserted data.
Create tailored documents with your data and your rules, without coding. Immediate ROI and a path to wider automation.
Learn More
Build Your Enterprise Apps
No code platform for back office innovators and citizen developers to create custom solutions in a fraction of the time.
Use Legito enterprise-wide, but teams get customized solutions. Organize data, views and tools for specific operations.
Learn More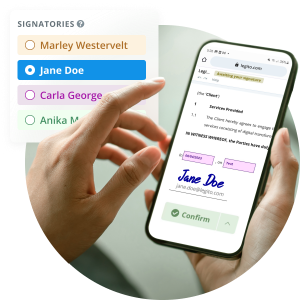
Free Electronic Signature
Trusted, legally binding, fast, and enterprise-level secure electronic signature. No fee.
Make it easy to do business when people work remotely. Easier to sign, easier to manage, easier to authenticate.
Learn MoreLegito End-to-End Tailored Solutions
Procurement pace and performance
No code automation platform to enable innovation and performance in procurement and sourcing. Drive organization success.
Supply chain management with Legito gives you control, speed, and oversight, while Legito automation sweats the details.


Enable operational excellence
No code automation delivering enterprise innovation and performance across all operations. Rapid deployment. Rapid results.
Deliver diverse operations to internal customers. Assured speed, control and oversight. One system for multiple needs.


Empower legal ops at scale
No code automation for legal ops to leverage expertise at scale. Optimized for humans. Serving enterprise needs.
Legito provides controls, automation and oversight so Legal Ops can deliver expertise on demand with efficiency.


Human-oriented automation
No code automation leveraging HR expertise across the enterprise. Optimized for humans. Designed for performance.
Automation, control and management for HR professionals keeping people and compliance at the heart of their work.
Learn More
Speed and controls for sales
No code automation platform empowering sales performance and agility. Equip sales professionals to enterprise goals.
From proposal to signature, Legito tools support the end-to-end sales process to close deals quickly and compliantly.


Efficient data-rich automation
No code automation platform empowering finance teams to serve enterprise objectives. Drive performance and innovation.
Legito automates process and documentation, combined with the power of your data, to control, manage and oversee F&A operations.


Deliver to your staff faster with less effort
Automation tools can reduce the normally high probability of (human) error, making it easier for staff to be self sufficient, helping everyone to reach a mutual understanding, creating sustainable solutions that increase all round efficiency.

Procurement pace and performance
No code automation platform to enable innovation and performance in procurement and sourcing. Drive organization success.
Supply chain management with Legito gives you control, speed, and oversight, while Legito automation sweats the details.
Enable operational excellence
No code automation delivering enterprise innovation and performance across all operations. Rapid deployment. Rapid results.
Deliver diverse operations to internal customers. Assured speed, control and oversight. One system for multiple needs.
Empower legal ops at scale
No code automation for legal ops to leverage expertise at scale. Optimized for humans. Serving enterprise needs.
Legito provides controls, automation and oversight so Legal Ops can deliver expertise on demand with efficiency.
Human-oriented automation
No code automation leveraging HR expertise across the enterprise. Optimized for humans. Designed for performance.
Automation, control and management for HR professionals keeping people and compliance at the heart of their work.
Learn MoreSpeed and controls for sales
No code automation platform empowering sales performance and agility. Equip sales professionals to enterprise goals.
From proposal to signature, Legito tools support the end-to-end sales process to close deals quickly and compliantly.
Efficient data-rich automation
No code automation platform empowering finance teams to serve enterprise objectives. Drive performance and innovation.
Legito automates process and documentation, combined with the power of your data, to control, manage and oversee F&A operations.
Deliver to your staff faster with less effort
Automation tools can reduce the normally high probability of (human) error, making it easier for staff to be self sufficient, helping everyone to reach a mutual understanding, creating sustainable solutions that increase all round efficiency.
Smooth & fast digital transformation
We know what banks, insurance companies, and other providers of financial services need. We know that for you, documents are essential to doing business. We know that your documents are complex. We know your document workflow, approvals, and signing processes can take a long time.
Legito automates these processes, making them faster and more efficient.
Learn MoreClose your next deal faster
Real estate documents need to be created, reviewed, in a specific order, and once agreed upon, finalized and signed in a specific order.
Paperwork and the surrounding processes can devour a lot of a real estate agent’s time. The proper automation tool can resolve all of these challenges, increasing your ability to win more business.
Learn MorePurchase and sell effectively
Retail companies need to be agile and prepared to quickly finalize agreements and deals with their suppliers, wholesale customers, and other partners.
The right automation tool will expedite your drafting, approving, and finalization of documents.
Learn MoreAutomate repetitive tasks
Consultants love to be thinkers and analysts. Unfortunately, the same formulas are repeated again and again, often across the same standard forms for different clients.
A robust, secure document automation solution will not only help you blow through these monotonous tasks with ease, generating documents customized for your clients’ unique needs but, paired with an agile automated workflow and document management system, it will be easy to keep track of important filing deadlines.
Learn MoreDelight your clients
It is frustrating to spend late nights drafting new versions of the same documents for different matters.
Not only will choosing the right document automation tool demonstrate to your clients that you’re a modern forward facing firm, but will also help you save time and transfer knowledge with ease.
Learn MoreSpend less time inputting data
Accounting, Audit and Tax firms are constantly battling an ever-growing mountain of paperwork and detailed processes.
A robust, secure document automation solution will allow you to spend more time winning clients, and innovating better ways to serve them.
Learn MoreEmpowering Public Servants
Public services need document administration. Build a better experience for you to transform how you serve the public.
At the core of every government service are documents that need to be created and managed. Legito automates government documents and processes to increase the potential of public servants.
Learn MoreBoost Your Members Efficiency
Portal for members to automatically draft documents using your centrally managed templates, with workflow & eSignature.
Allow members to close deals faster by transforming how they generate documents. Help them serve clients better.
Learn MoreSmooth & fast digital transformation
We know what banks, insurance companies, and other providers of financial services need. We know that for you, documents are essential to doing business. We know that your documents are complex. We know your document workflow, approvals, and signing processes can take a long time.
Legito automates these processes, making them faster and more efficient.


Close your next deal faster
Real estate documents need to be created, reviewed, in a specific order, and once agreed upon, finalized and signed in a specific order.
Paperwork and the surrounding processes can devour a lot of a real estate agent’s time. The proper automation tool can resolve all of these challenges, increasing your ability to win more business.


Purchase and sell effectively
Retail companies need to be agile and prepared to quickly finalize agreements and deals with their suppliers, wholesale customers, and other partners.
The right automation tool will expedite your drafting, approving, and finalization of documents.


Automate repetitive tasks
Consultants love to be thinkers and analysts. Unfortunately, the same formulas are repeated again and again, often across the same standard forms for different clients.
A robust, secure document automation solution will not only help you blow through these monotonous tasks with ease, generating documents customized for your clients’ unique needs but, paired with an agile automated workflow and document management system, it will be easy to keep track of important filing deadlines.


Delight your clients
It is frustrating to spend late nights drafting new versions of the same documents for different matters.
Not only will choosing the right document automation tool demonstrate to your clients that you’re a modern forward facing firm, but will also help you save time and transfer knowledge with ease.


Spend less time inputting data
Accounting, Audit and Tax firms are constantly battling an ever-growing mountain of paperwork and detailed processes.
A robust, secure document automation solution will allow you to spend more time winning clients, and innovating better ways to serve them.
Empowering Public Servants
Public services need document administration. Build a better experience for you to transform how you serve the public.
At the core of every government service are documents that need to be created and managed. Legito automates government documents and processes to increase the potential of public servants.


Boost Your Members Efficiency
Portal for members to automatically draft documents using your centrally managed templates, with workflow & eSignature.
Allow members to close deals faster by transforming how they generate documents. Help them serve clients better.


Optimize back office services
A single platform for no code automation across the whole enterprise. Optimized for humans. Designed for teams.
Digital transformation for all back-office teams. Data-driven controls, automation and management for rapid deployment and ROI.
Grow capability not headcount
No code automation platform for back office teams to support growth through performance and innovation. Human friendly.
Colleagues can build automated solutions that you won’t outgrow. Expand without growing pains. Simple deployment, rapid results.


Agile and fast - just like you
A no code automation platform you won’t outgrow, empowering start-ups to do more and expand. Quick start, quick results.
Use Legito affordable automation tools to multiply your results, not your headcount. Deploy without fuss, evolve as you grow.
Learn More
Optimize back office services
A single platform for no code automation across the whole enterprise. Optimized for humans. Designed for teams.
Digital transformation for all back-office teams. Data-driven controls, automation and management for rapid deployment and ROI.
Grow capability not headcount
No code automation platform for back office teams to support growth through performance and innovation. Human friendly.
Colleagues can build automated solutions that you won’t outgrow. Expand without growing pains. Simple deployment, rapid results.
Agile and fast - just like you
A no code automation platform you won’t outgrow, empowering start-ups to do more and expand. Quick start, quick results.
Use Legito affordable automation tools to multiply your results, not your headcount. Deploy without fuss, evolve as you grow.
Learn More
Tomas Fiala
Director

Sony Varughese
Chief Technology Officer

Tawnya Gilreath
M&A Advisor, Director of Forms
Legito gives us the ability to take away things that create issues. It saves so much time, it is really awesome.Explore More Success Stories

Galya Oster
Emerging Market Trade Finance Specialists
Paul V. Saunders
Chief Innovation Officer and Partner

Nel Pelle
Sales Manager
Using Legito, we reduced our checking tasks from 20-50 minutes down to 5 minutes per single contract.Explore More Success Stories
Jeremy Aber
Software Attorney

Eli Cohen
Chief Operating Officer
Increase Efficiency Now


