Q2 2026: Features, Features, Features
1) Permission- based Character-level formatting in Legito Documents
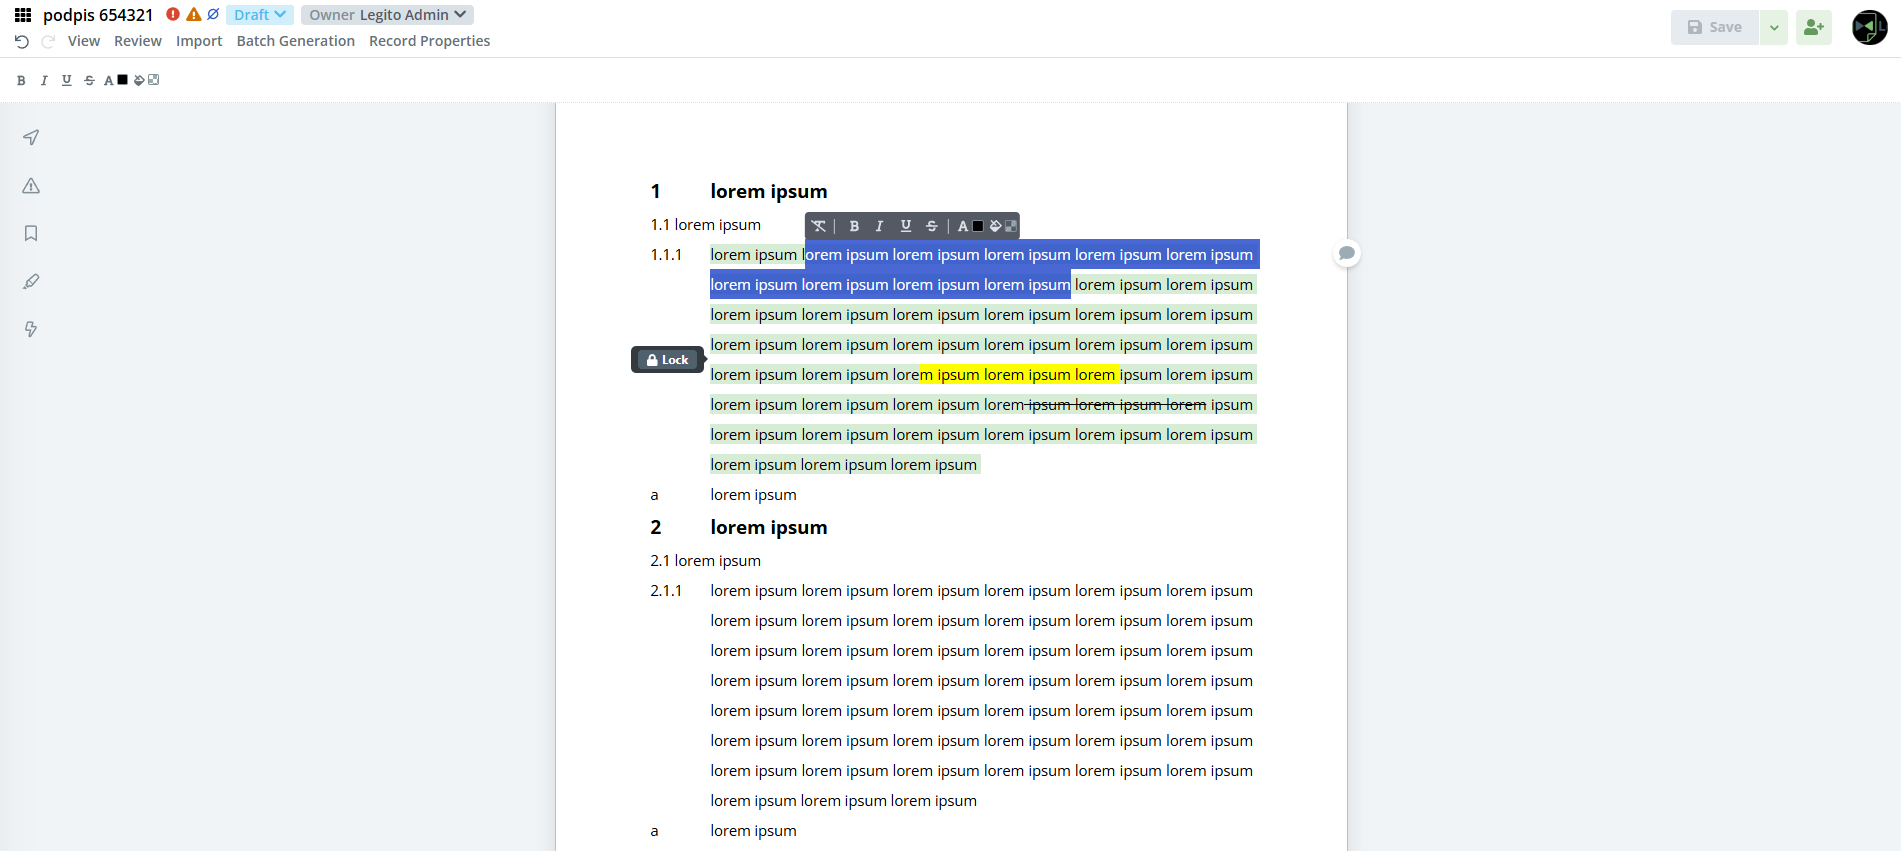
The character-level formatting feature introduced in Q1 2026 has been expanded. Up until now, users could set character-level formatting in the Template Editor then display it in the Document Editor. Now, users can perform character-level formatting for text input and text elements directly in the Document Editor. A standard set of formatting options is available with the following formatting settings:
- Bold
- Italic
- Underline
- Strike
- Text color
- Highlight color
Document Editor formatting is permissions based so that template authors can specify beforehand what kind of formatting settings should be allowed for a specific element. For example, some elements are only allowed to be in bold or italics. This setting can be found in Template editor > Properties > Lock Formatting.
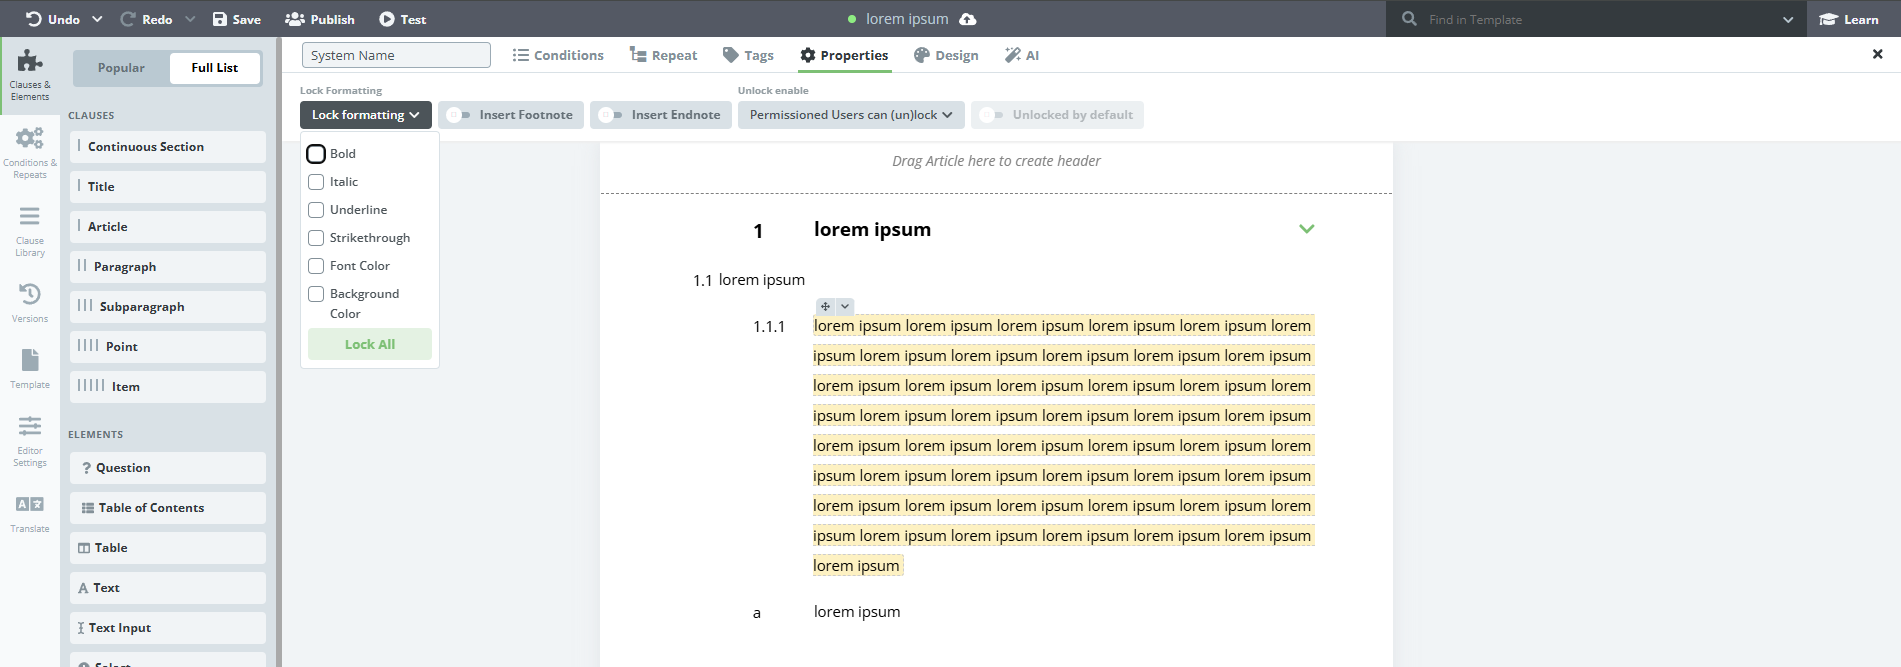
The formatting process is very straightforward. Users with permission to “Unlock Document Text and add Clauses” can doubleclick the element to unlock it. Selecting any part of the text triggers the formatting panel to appear. Finally, users can select and apply their desired formatting.
2) Update translations of older Template Versions
Updating translations of previous template versions without creating a new Template Suite version can be achieved by clicking the new “Update Translation” button, which is available for any outdated template version. Similarly, opening a document record based on an older template version presents the option to update the document if an updated translation is available.
![]()
![]()
3) New out-of-office and delegation settings
Users can now mark themselves as “out of office” and select another user to be delegated as a temporary stand-in. Delegated users will have all the privileges of the original user, which means they will be able to see all of their documents.Delegated users will also be able to stand in for the original user’s duties, such as review or approvals. The delegated user is easily identified by a special icon beside their name. All actions performed by delegated users are recorded in the timeline as standard. The timeline will also display which actions were performed by a delegated user.
To control who can use the new delegation feature, there is a new “Can Delegate” permission. This can be found in People > User > Workspace Settings > Can Delegate.
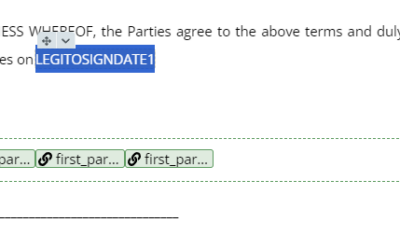
4) Option to sign files other than PDF
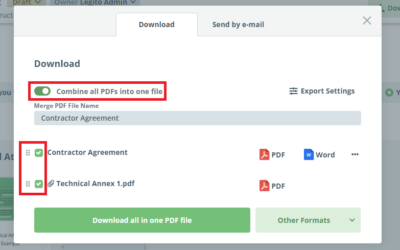
Uploaded files can now be signed not just in PDF, but in several other formats by converting these files to PDF first. Any uploaded attachment that can be converted to PDF can be signed just as easily as any other native Legito document.
List of currently supported file types:
- docx
- doc
- rtf
- txt
- odt
- ods
- xlsx
- xls
5) New API version – API v8
We are in the final phases of refining the new REST API version 8. This version will rework some old endpoints and implement several new ones. Many of these changes were created thanks to great suggestions from our customers.
New functionality:
- Ability to perform CRUD via JSON Integration
- Running an AI agent via API
- LegitoSign electronic signatures
- Full-text search on records
- Reworked Document Version data model
- New Template Suite capabilities
- Create a Template Suite by importing a docx file
- List all fillable elements of a Template Suite’s latest published version
- New file management endpoints
- Labels can now be updated
- Workflow improvements
- Much richer Event filtering
- User out-of-office delegation
- Object Records expose their workflow stage
- All new user permissions
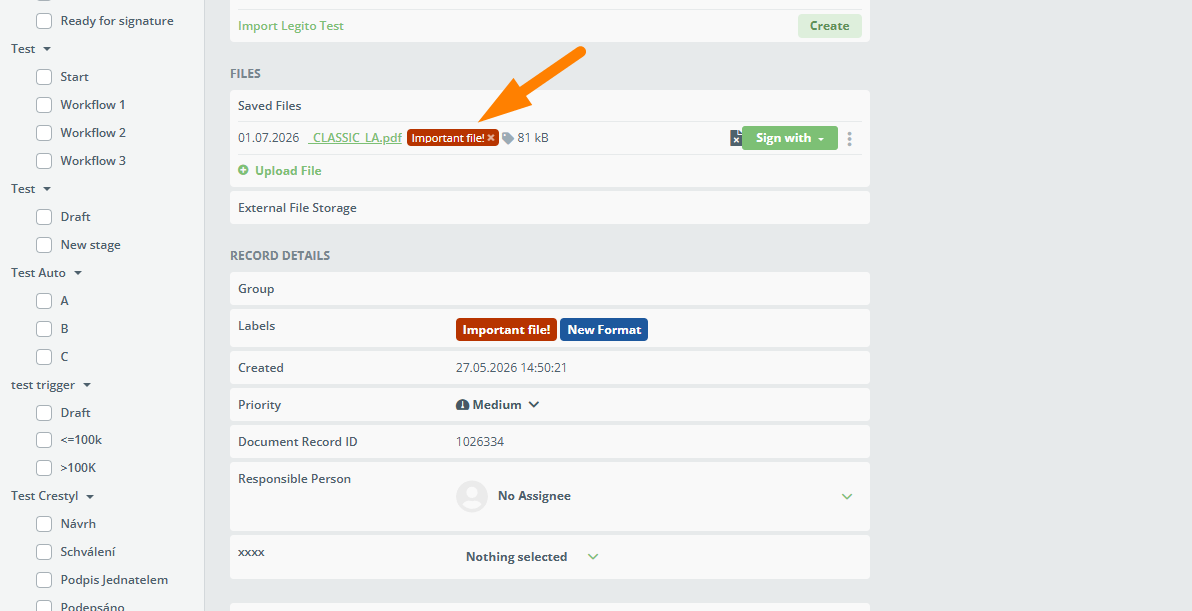
6) Better labels
The labels property has been enhanced to enable the addition of labels for either one, or both Legito document records and uploaded files. Labels can be customized upon creation, or afterwards by clicking on the hamburger button on the label.
7) Deeper integration with Adobe Sign
Legito’s Adobe Sign integration has been enhanced by introducing support for expiration date and Adobe approvers.
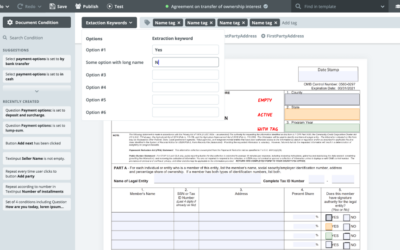
Firstly – an option has been added to insert the expiration date for the eSignature process. The expiration date field is optional, and can be enabled in the same signing modal where recipients are added. If the field is enabled but a date is not specified, the system automatically sets the expiration date to 120 days from that date. There is also an option to have the date filled out automatically based on the document. Where there is a Date Element with a “Signing Date” tag applied to it, the system will automatically take this value and set it as the expiration date.
Secondly- Legito now supports Adobe approvers, so the system can see participants in the selected Adobe workflows and forward them to Adobe when the signing process has started.
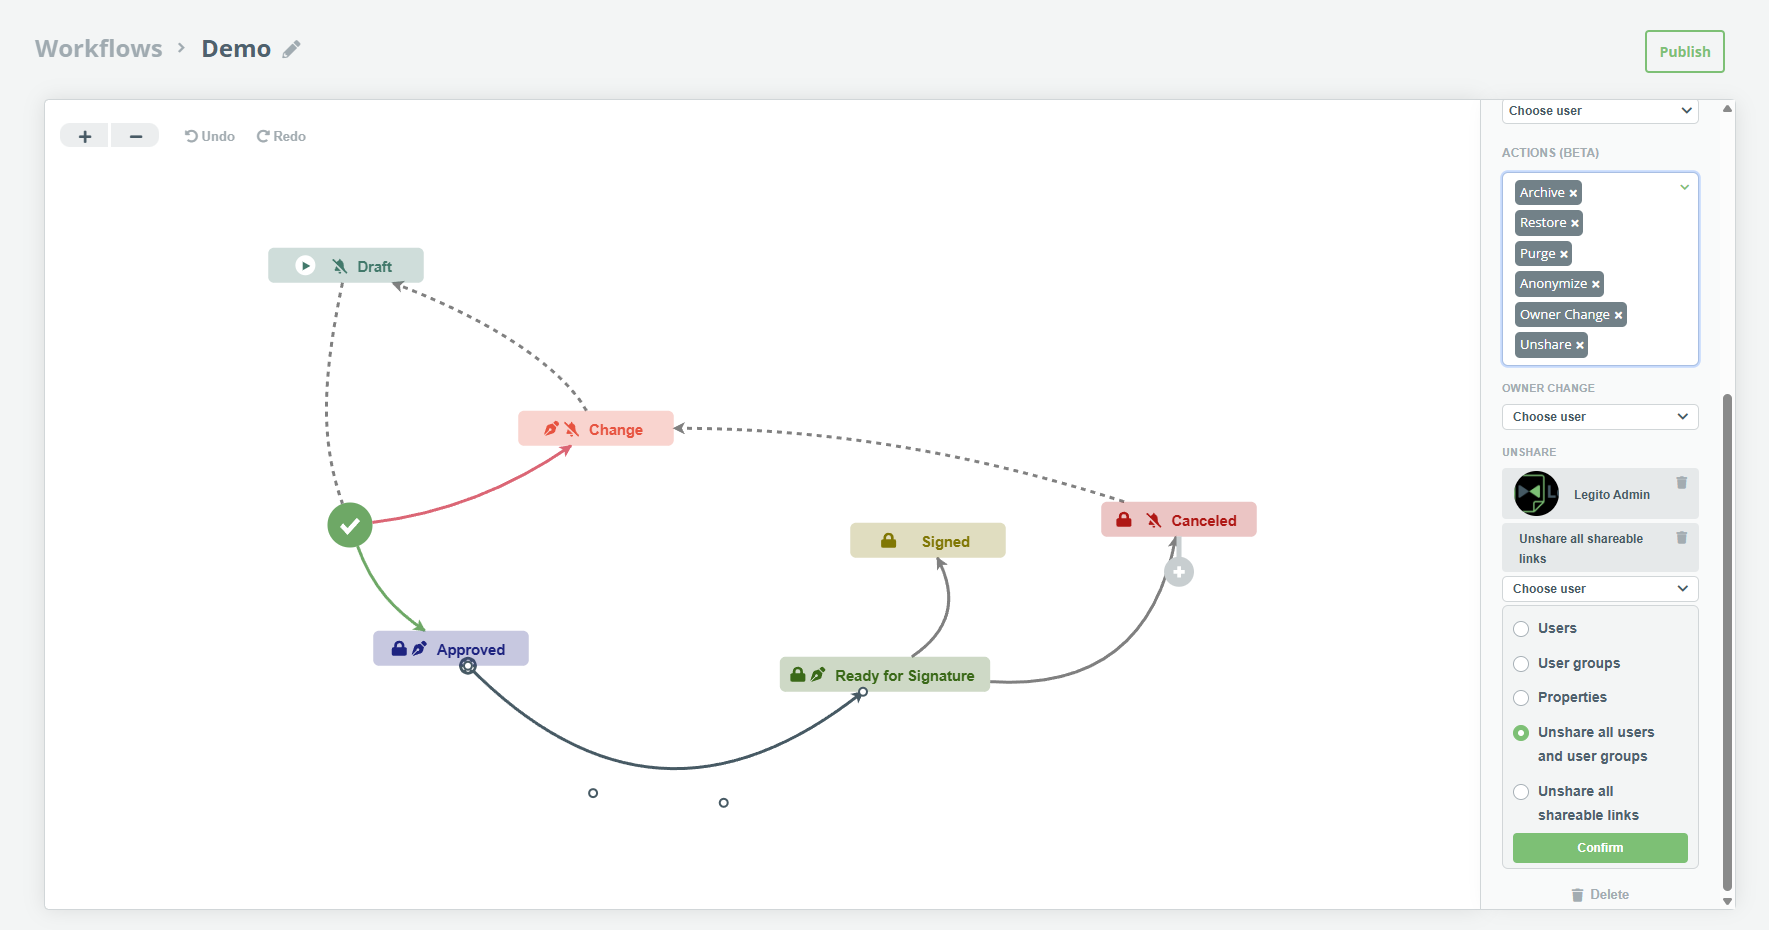
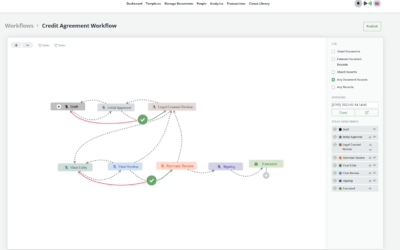
8) Document record actions triggered by workflow stage change
Document record actions can now be tied to Workflow stage changes. This means that a predetermined action (or actions) automatically triggers whenever a Workflow stage changes. Actions can be set up in the Workflow Editor by clicking on the arrow between stages (stage change).
The following actions are supported in this feature’s current beta version:
- archivation – archives the document record
- restoration – restores of the document record from the archive
- purge – permanently deletes the document record
- anonymize – anonymizes the document record
- Owner change – changes the owner of the document record (it is possible to pick a specific user)
- unshare – unshares the document record.
More actions can now be selected for a single stage change. If the user chooses the option to unshare the document record, these additional options are available:
- Users – unshares specific user/users
- User groups – unshares specific user group/groups
- Properties – unshare users from specific sharable properties
- Unshare all users and user groups – broad unshare option that unshares the document record from all users and user groups
- Unshare all shareable links – deactivates all external share links
- Users can select and combine multiple unshare options.
- Finally, all document record actions will trigger for both manual and automatic stage changes.
9) MCP Server
A range of new AI features have been implemented. All of these AI features are powered by the industry standard Model Context Protocol (MCP). MCP works by connecting a large language model to Legito’s internal API so it can understand and act on requests across documents, templates, and workflows.
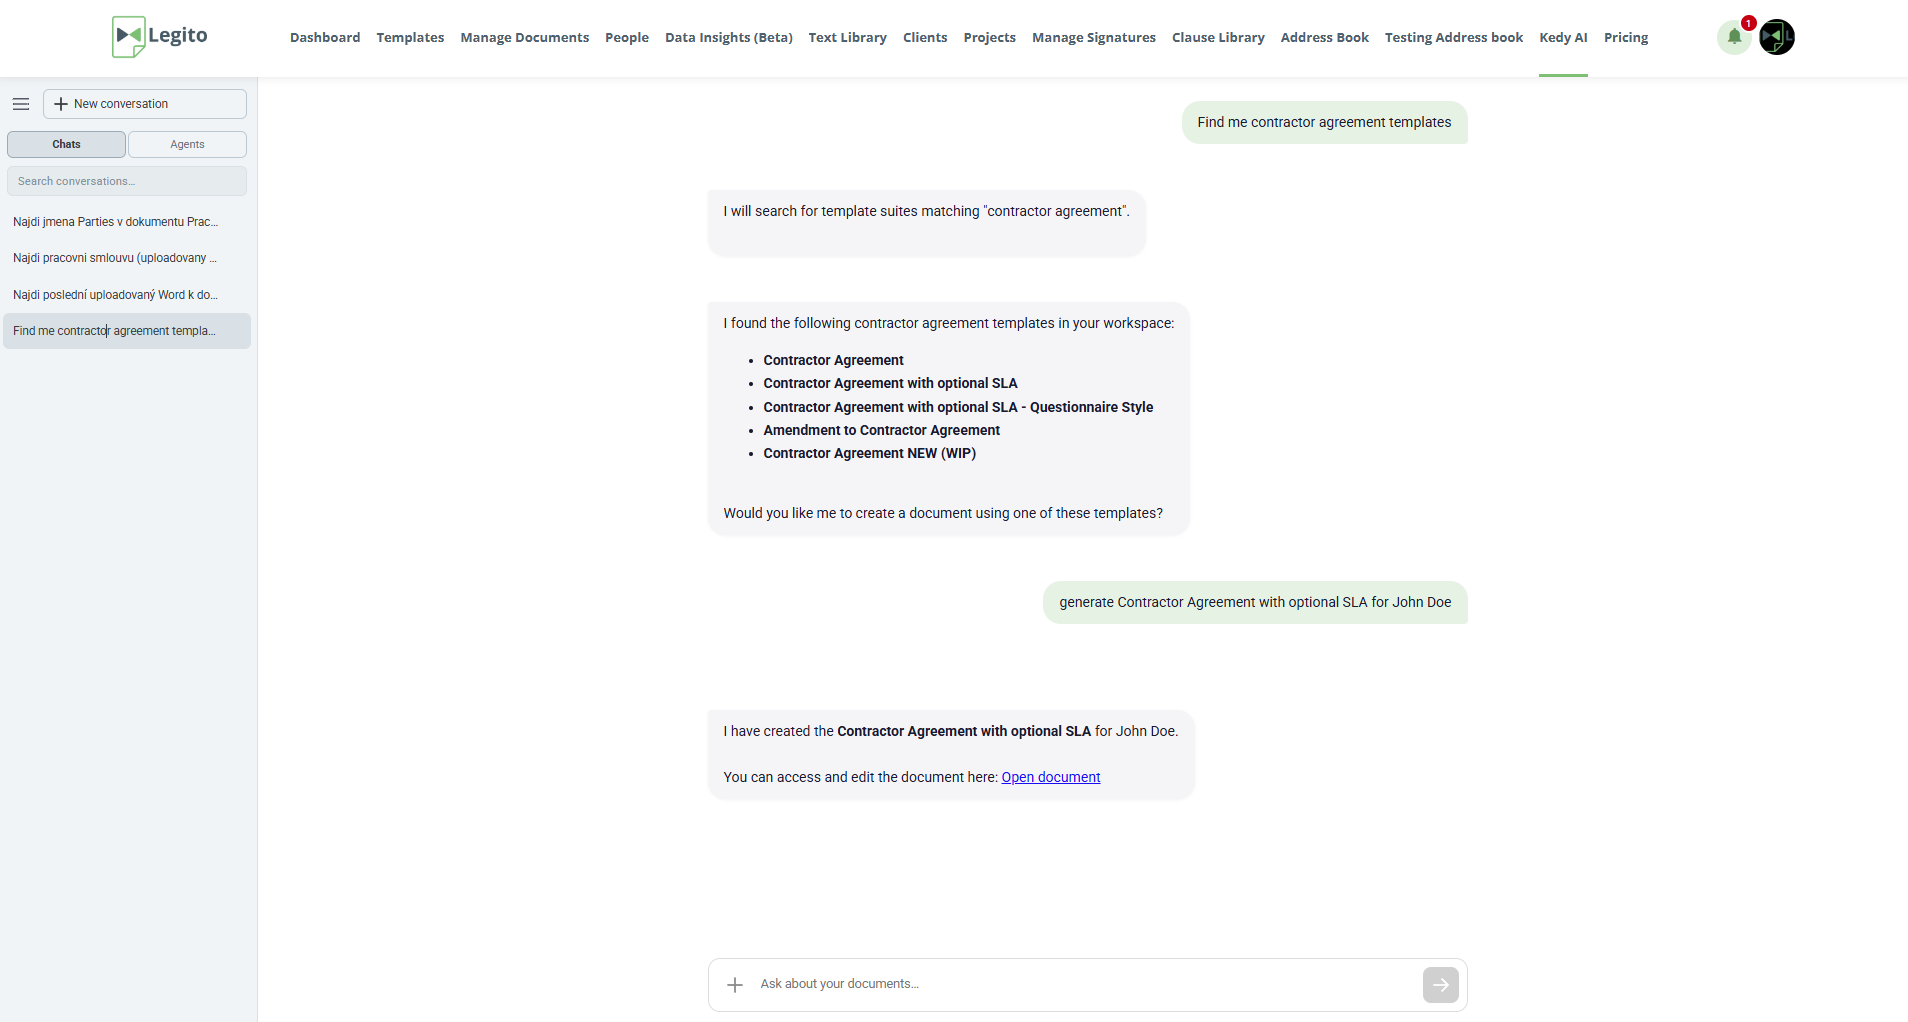
10) Kedy AI
Introducing Legito’s new AI Assistant, Kedy AI. By simply chatting with Kedy, users can control most of the functionality that Legito offers using natural language. Kedy AI can be found in the main menu at the top of the page.
Kedy AI can now perform these actions:
- Document creation from templates
- Perform search in Documents and use filters
- Creation of a new template from uploaded files
- Document management actions such as sharing, archivation, deletion or owner change
- Change workflow stages or show available workflow stages for given document
- Offer download links for requested documents
- Fill out documents based on the template instructions (elements have a special AI field for exactly this purpose)
- Offer more guidance by providing links to our knowledge base
- Provide data insights
- Fill out metadata such as document record properties
- Manipulate with Object records – create, delete, change owner, change wf stage etc.
In the case of unclear requests, KedyAI will ask for clarification or confirmation, in the same way as other mainstream AI agents.
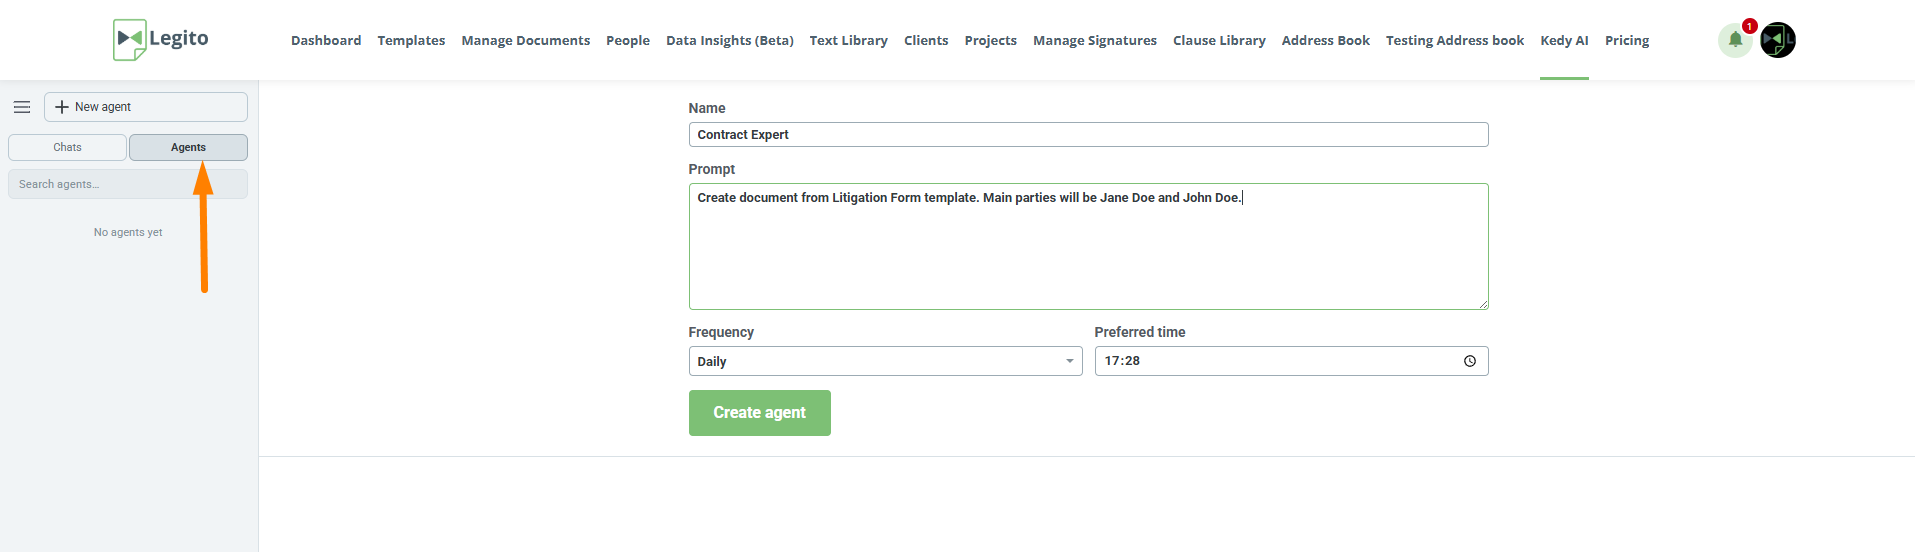
11) AI Agents
Kedy AI already supports agentic workflows, meaning users can create agents to perform assigned tasks at predetermined times. Tasks can also be run manually. Agents can be accessed via Kedy AI and switching to the Agents tab in the left panel.
12) Kedy AI Dashboard Widget
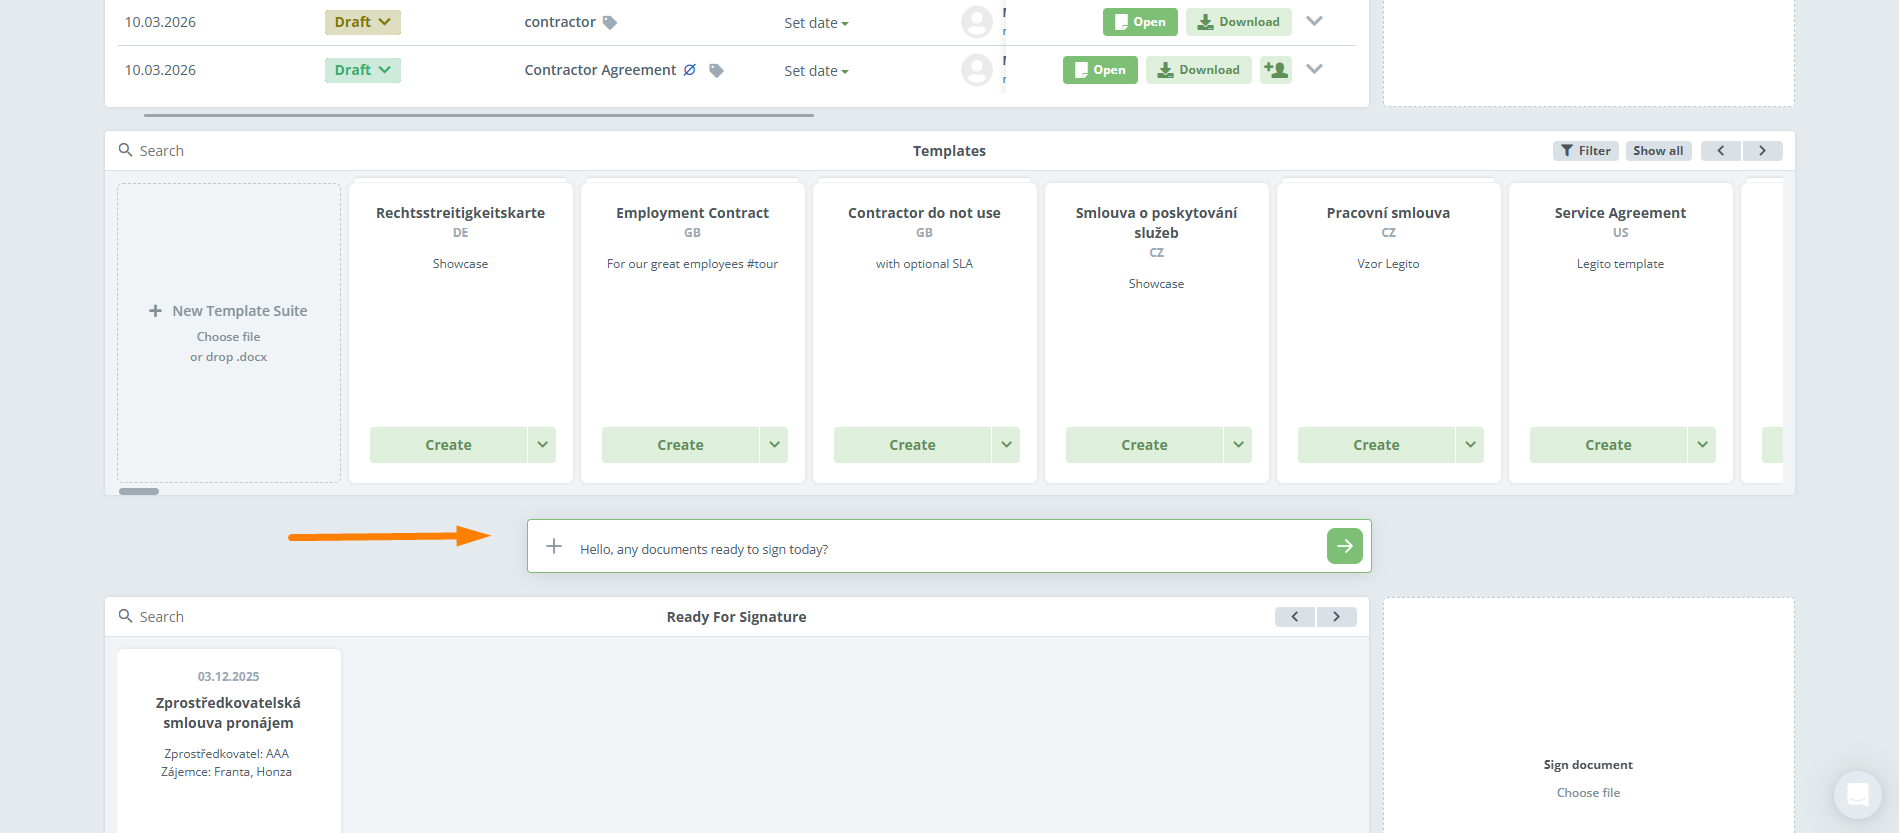
Kedy AI can be accessed from a newly added widget. The widget can be added to the dashboard the standard way by clicking “Customize Dashboard” and selecting the “Kedy AI” widget. The widget functions as a chat box where you can task Kedy AI directly. After entering the request, the user is redirected to the standard Kedy AI interface.
13) Kedy AI Token Allocation and Quotas
Introducing the new Kedy AI Token System. Each Workspace is allocated a dedicated volume of AI tokens for a specific period. Tokens power all native AI-driven tasks within your environment.
Tokens are managed at Workspace level and will automatically reset on a monthly basis.
- Existing Clients (Loyalty Bonus): To thank you for being a valued customer, your Legito Workspace will start with an allocation of 2 million AI tokens.
- New Workspaces: All newly created workspaces will receive a standard default allocation of 1 million AI tokens per month.
Tokens are deducted when a request utilizes Legito’s dedicated Kedy AI servers. If you use advanced setups like MCP (Model Context Protocol) where the AI engine runs outside Legito’s server infrastructure, no tokens are spent,with one important exception noted below.
| Feature / Tool | Consumes Tokens? | Details |
| Kedy AI Chat | Yes | Standard chat queries, interactive prompting, and contextual discussions run through our core AI server. |
| AI Agents | Yes | Automated background agents performing multi-step actions require server processing power. |
| Word-to-Template Conversion | Yes (Always) | Converting regular Word documents into reusable templates inherently relies on our custom backend parser and AI servers. Note: This tool always consumes tokens, even if initiated via MCP. |
| MCP Integration (General) | No | If you trigger custom tool actions via MCP that bypass our central AI processing server, no tokens are consumed. |
If your allocated AI tokens are used up before the end of the month, any active AI requests are temporarily paused. During this time, the chat will stop responding, agents will not execute, and the Word-to-Template converter will be unavailable.
To keep you clearly informed, a prominent red notification banner will appear at the top of your Kedy AI section, displaying the following message:
⚠️ AI token limit reached. Kedy AI is temporarily paused and will resume once AI tokens are renewed next month.
When the new monthly period begins, Workspace tokens will automatically renew to full capacity, and all features will instantly resume operation.
14) Kedy AI User Permissions
To give you granular control, we have added a new AI Permissions Section inside the People module.
- What it does: Toggling the checkbox delegates whether a specific user can view/use the Kedy AI section and see the Kedy AI dashboard widget.
- Default behavior: To ensure a smooth transition, whenever Kedy AI is enabled in a workspace, the user checkbox default setting is ON for everyone. This can be turned OFF manually for specific users when required.
- API Support: The Kedy AI user permission is fully integrated into API v8 for automated user provisioning.
15) New Permissions for MCP Integration
A dedicated permission to control MCP Integrations to the aforementioned AI section has been added. By default, a user’s MCP Integration permission is automatically enabled upon activation of the MCP Integration in the Workspace in Manage Workspaces. If the MCP Integration is not enabled in the Workspace, permissions will be unavailable to users and will remain off. Once user permission is enabled, the user can integrate their account with third-party applications via the Workspace MCP.
16) Enhanced AI conversion from Word to Template
Word to Template AI conversion has been enhanced. Conversion is executed by our in-house model which is continuously trained on more data. As such, this feature will evolve to become more powerful and robust.
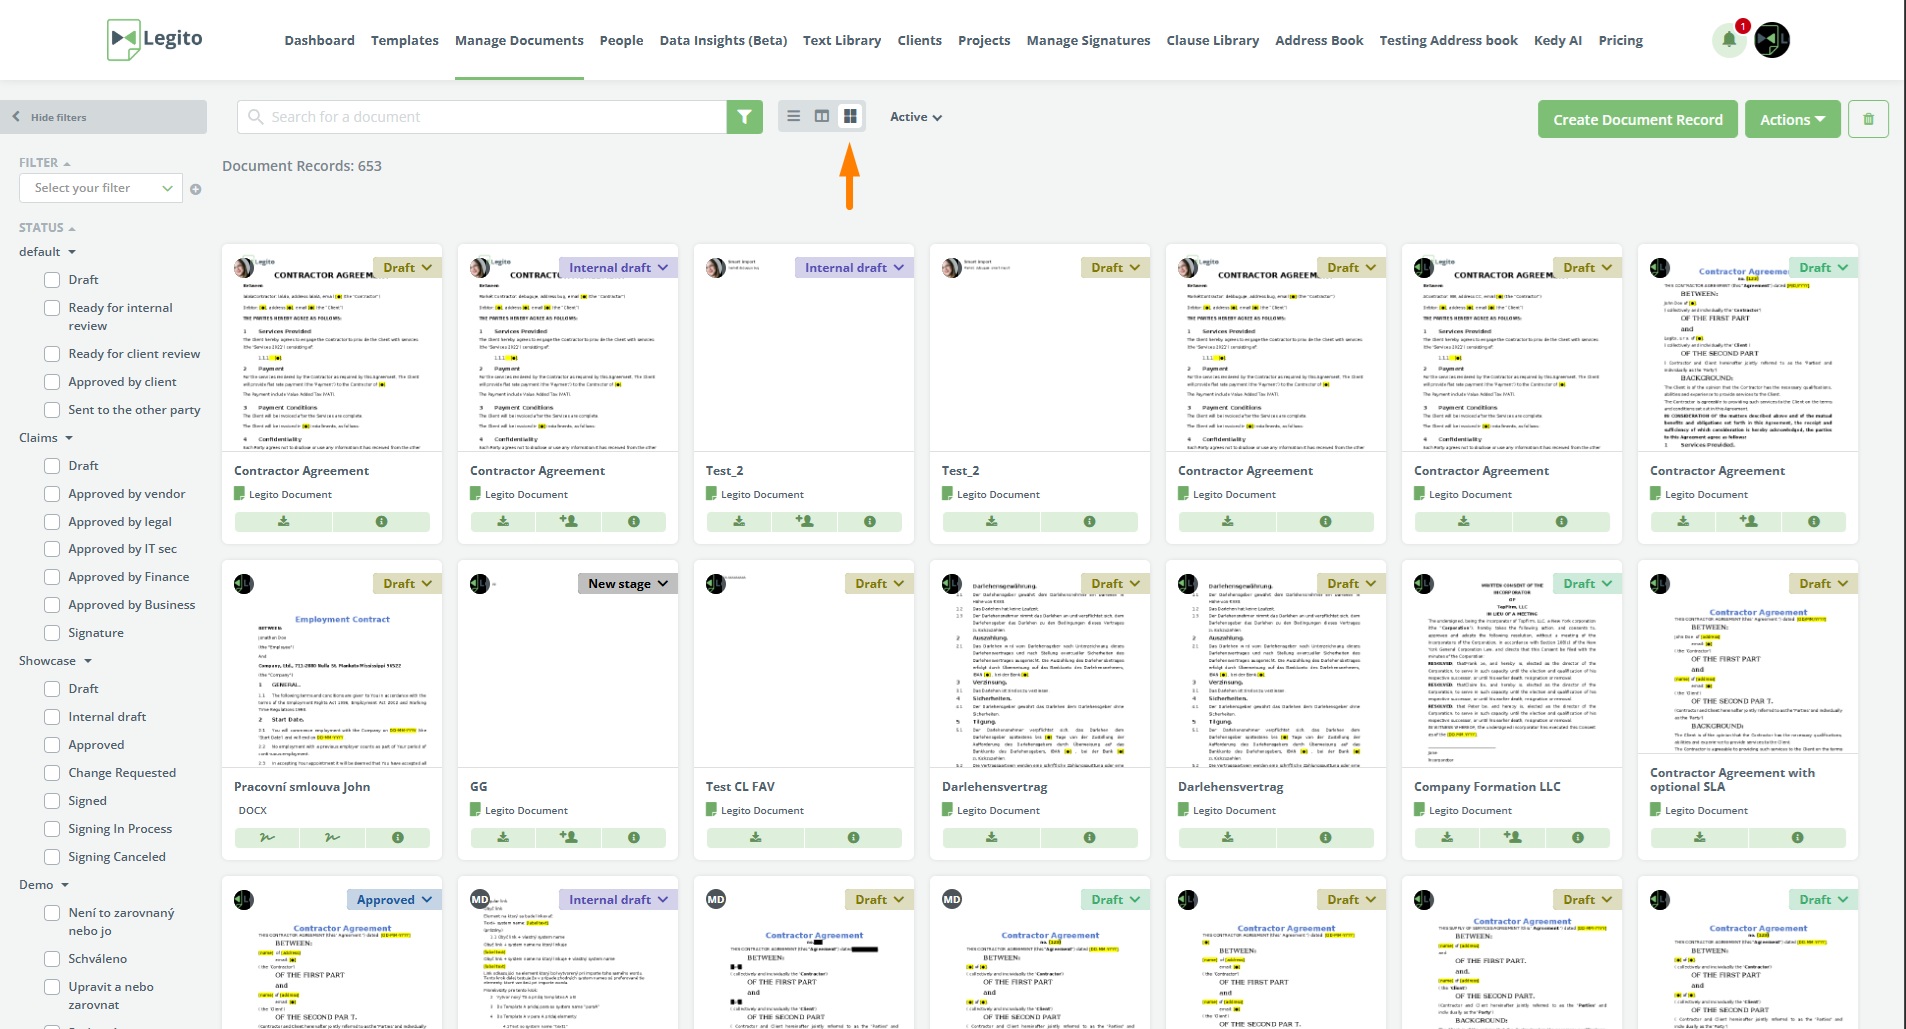
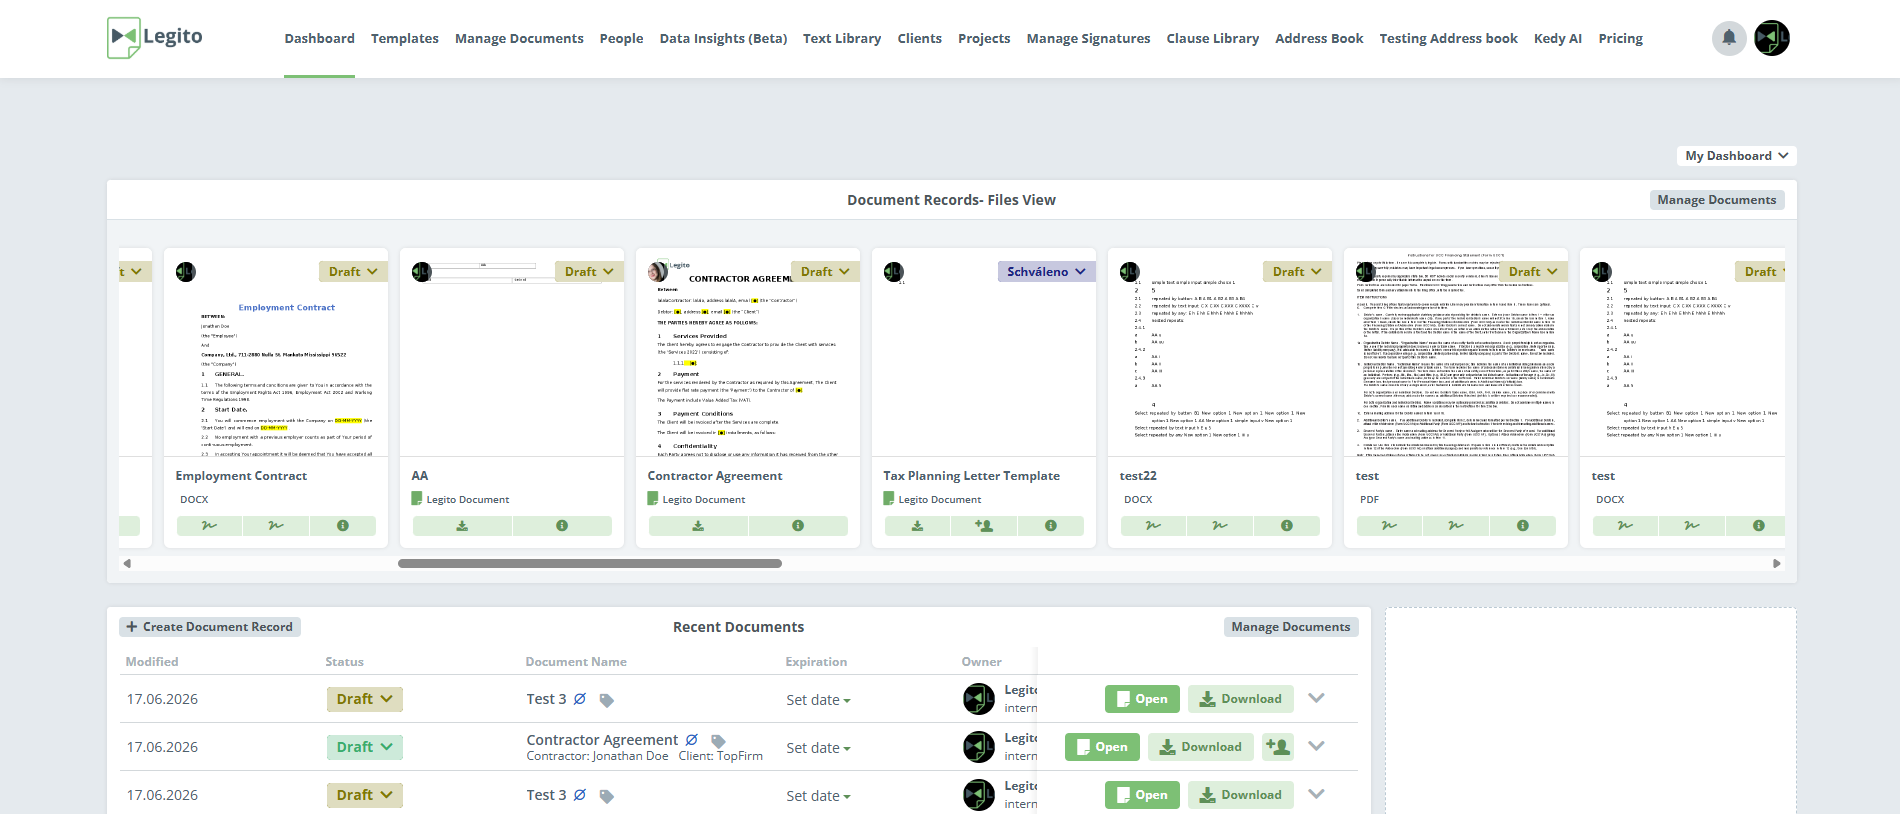
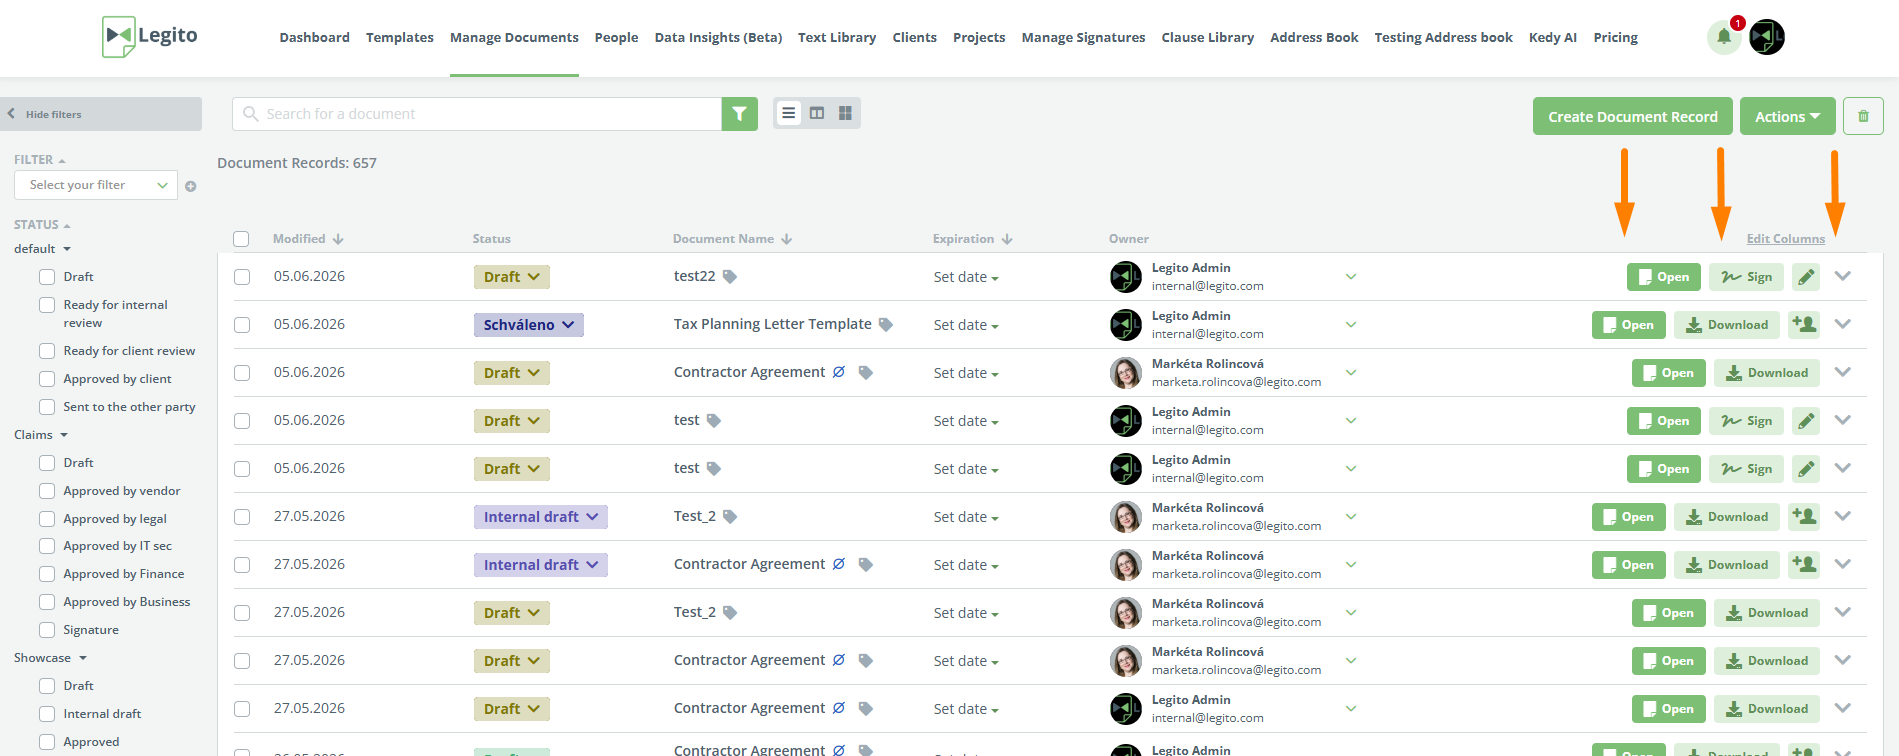
17) New Files View for Manage Documents
Introducing a completely new layout option for visualizing document records in the Manage Documents section. The new layout displays each document record as a small tile,and a thumbnail generated from the first exportable document in the Template Suite. It can be selected by clicking on the new icon next to the grid and kanban options.
18) Files view Dashboard Widget
The aforementioned Files View is also available for the new Document records dashboard widget.
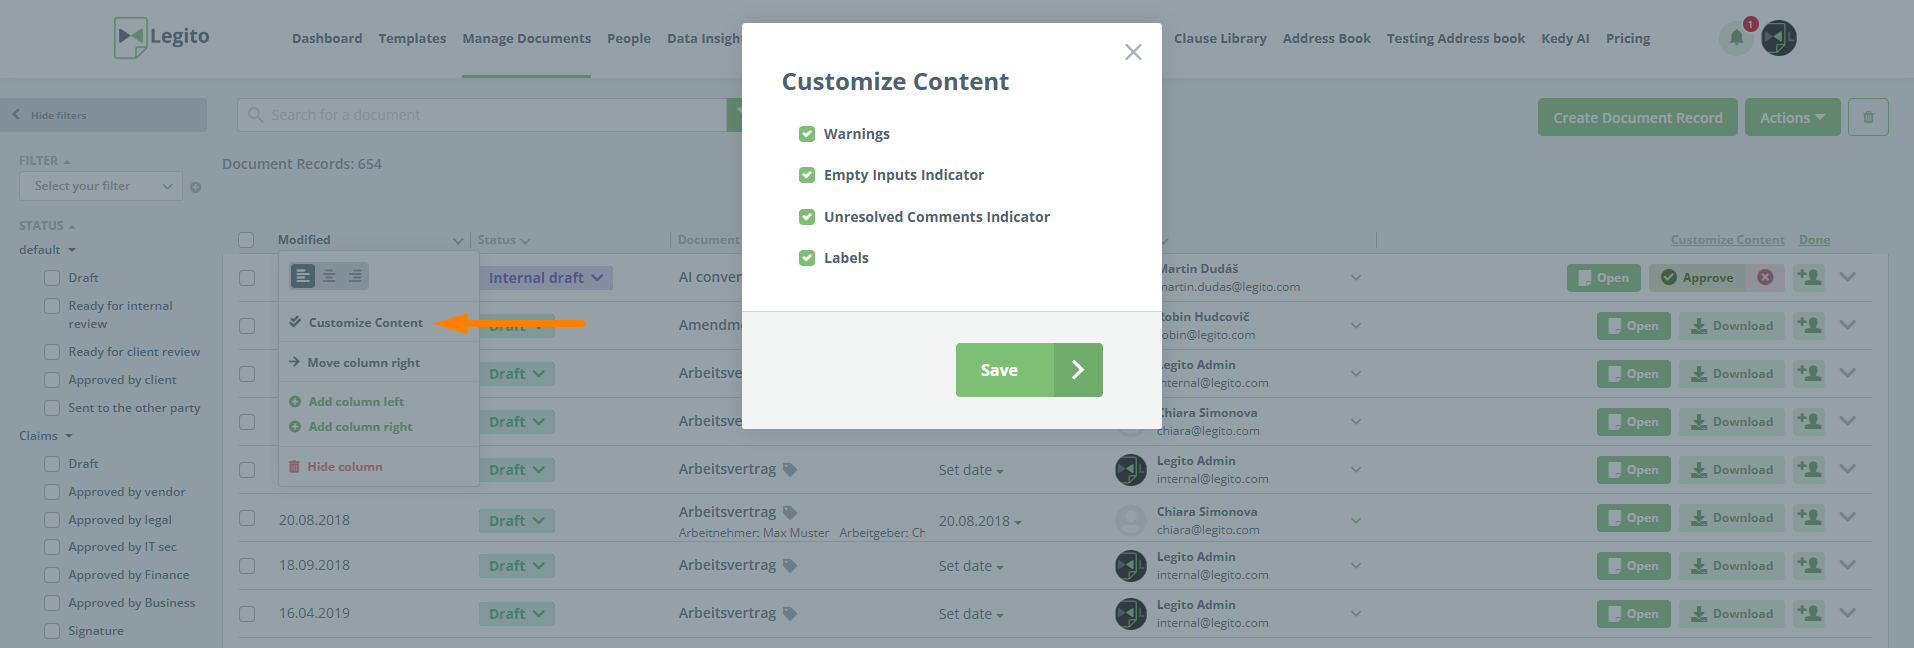
19) Customizable Document Name Column
There are several new options on how to customize layout in the Manage Document section. Firstly, new customizations are available for the Document Name Column. Clicking on “Customize Content” for this column allows the user to select what information is included.
The following options are available:
- Warnings
- Empty indicators
- Unresolved comments
- Labels
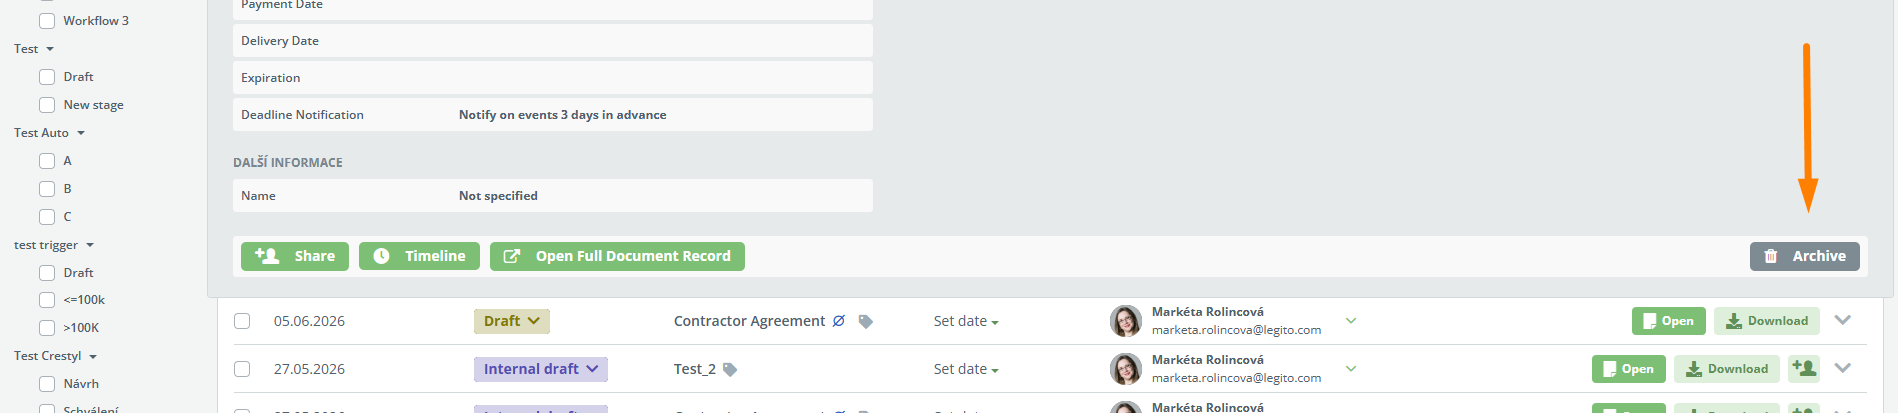
20) Customizable actions in Manage Documents
Editing the farthest right column with the buttons is now possible. One change that users will immediately notice is there are now up to 4 available buttons – 3 of which are optional. Each button can be individually customized with the following available options:
- Open
- Download, Signature or Approval
- Email, Signature or Approval
- Approval or Signature
- Edit
- Download
- Approval
- Sign
- Share
- Detail
Another notable change is the new “Open” button that effectively replaces the View and Edit buttons. The Edit button is still available, but only to edit document records for uploaded files.
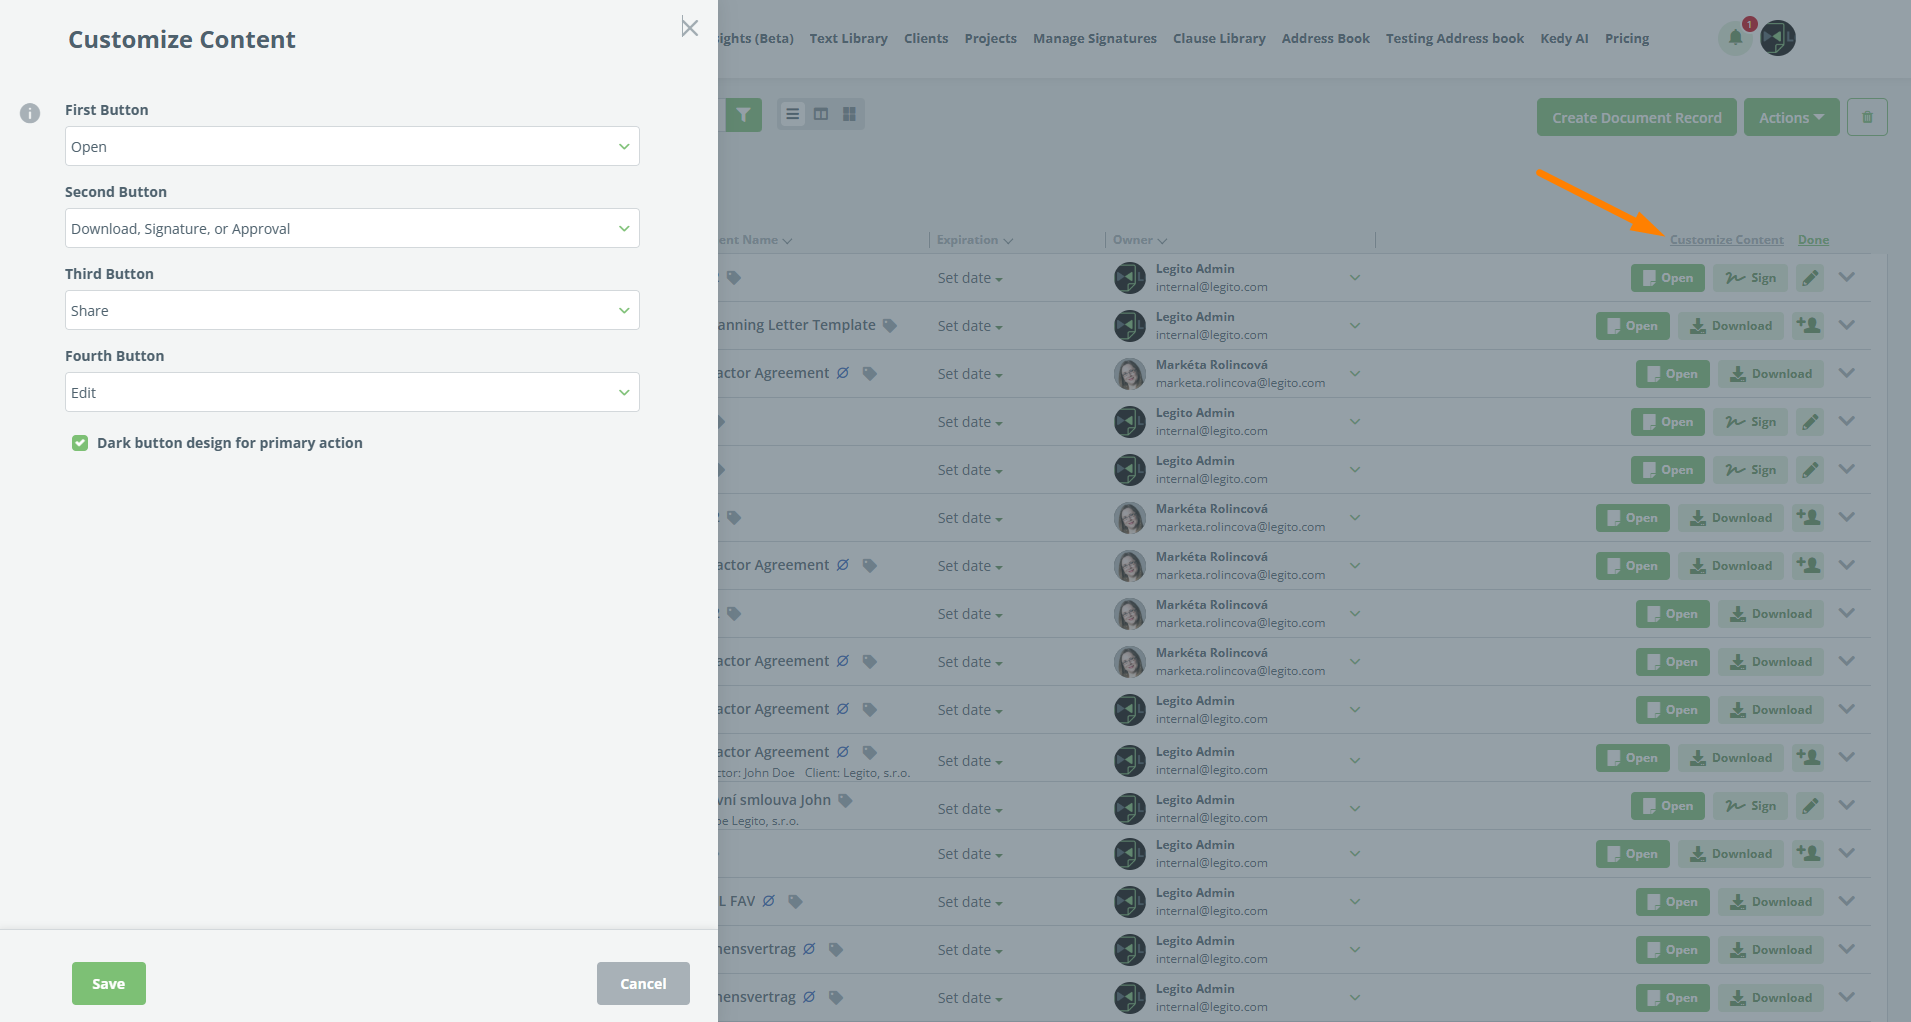
New approval button.
Buttons have two variants – large with text, and small with icons only.
All buttons are dynamic – reflecting available options for a given Document Record.
This also works for other layouts.
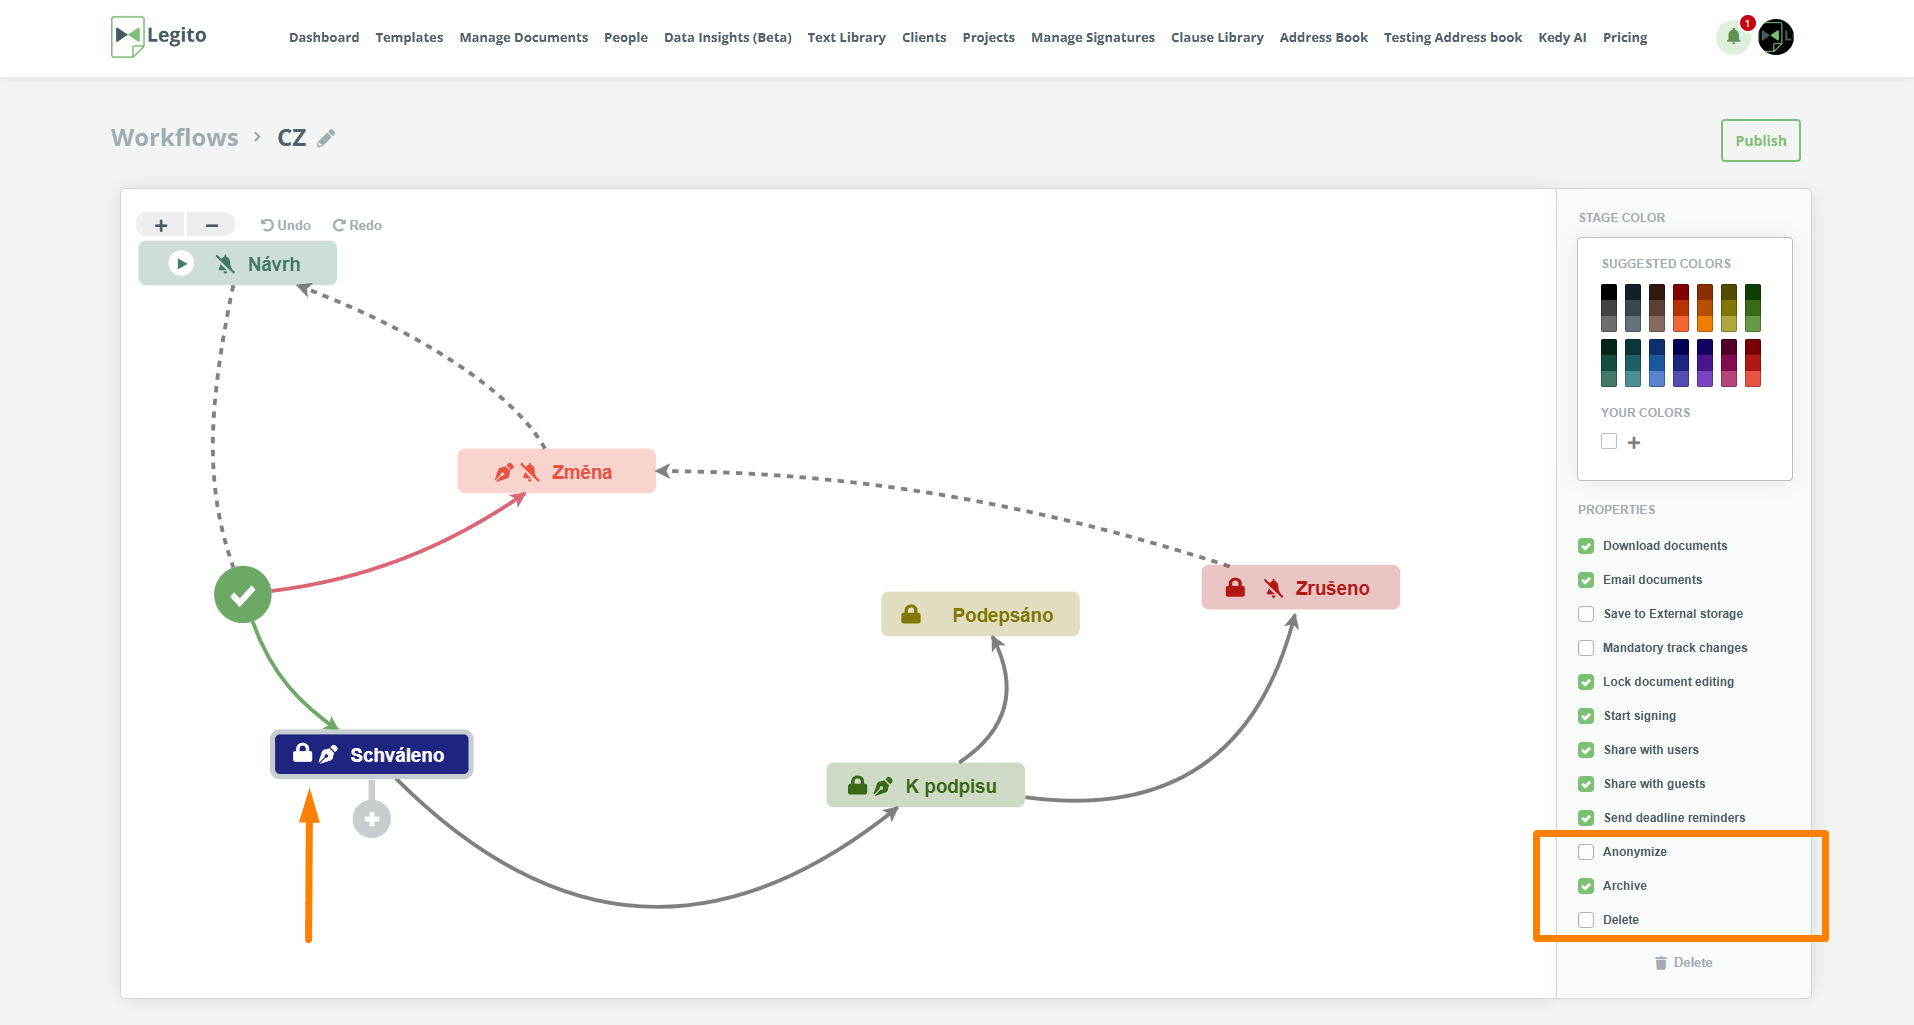
21) Configurable Anonymize, Archive and Delete Buttons
The action buttons to anonymize, archive, and delete document records in the Manage Documents section are now optional and are individually configurable for each stage. There are 3 new dedicated checkboxes for each button that can be found by clicking on a workflow stage in the Workflow Editor.
22) Changing the level of User-added clauses
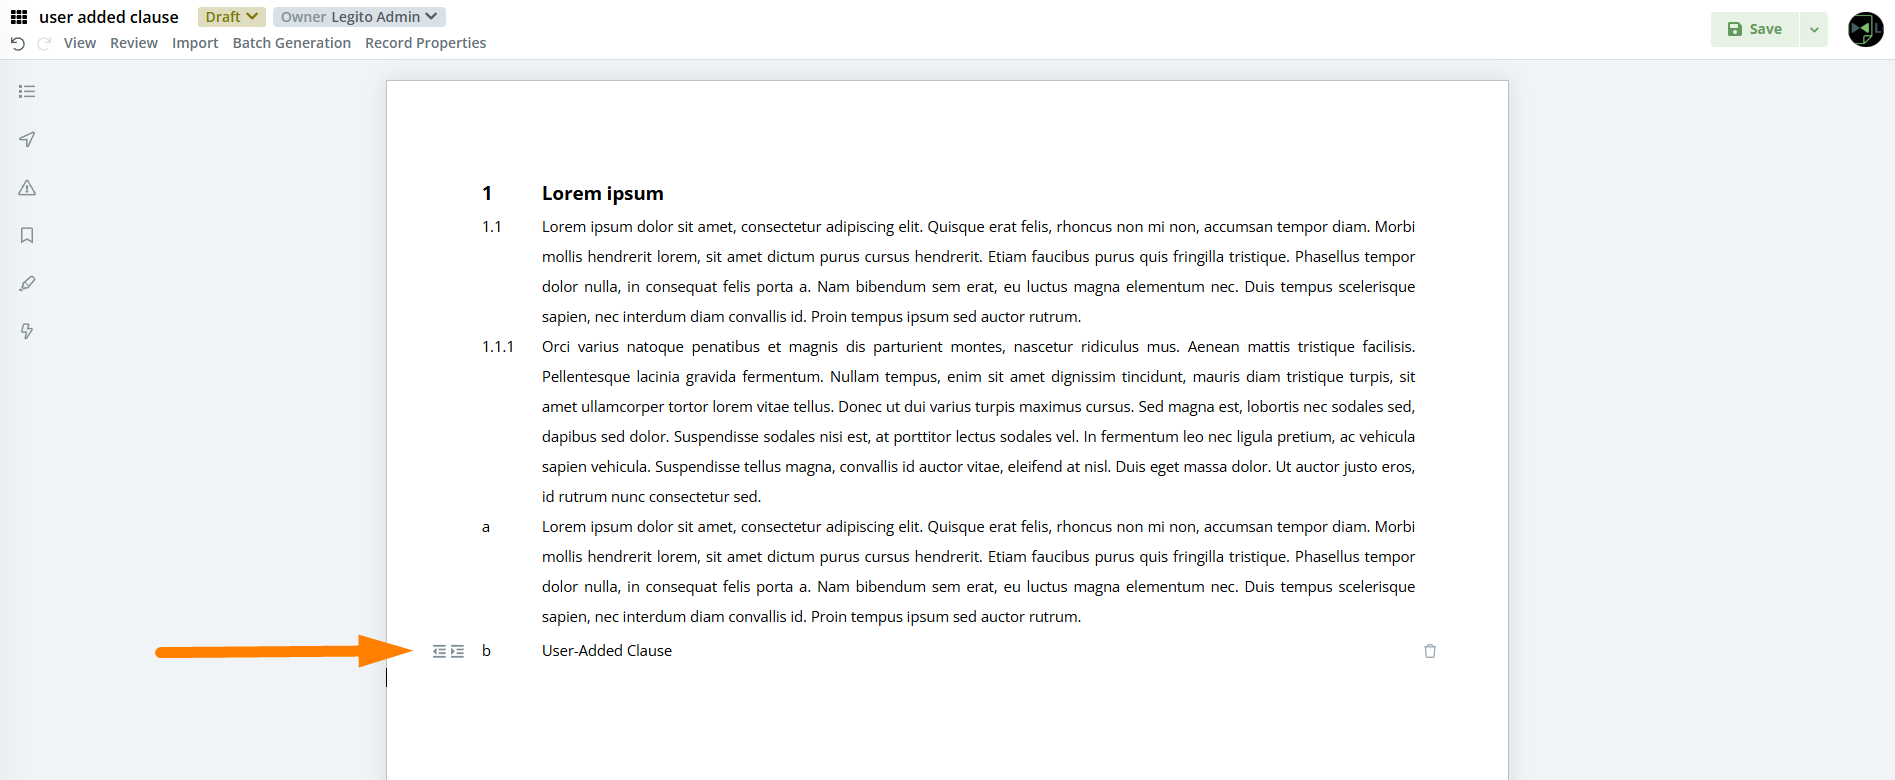
Changing the level of a User-added clause in Document Editor is now possible by clicking on the new icon found to the left of the User-added clause.
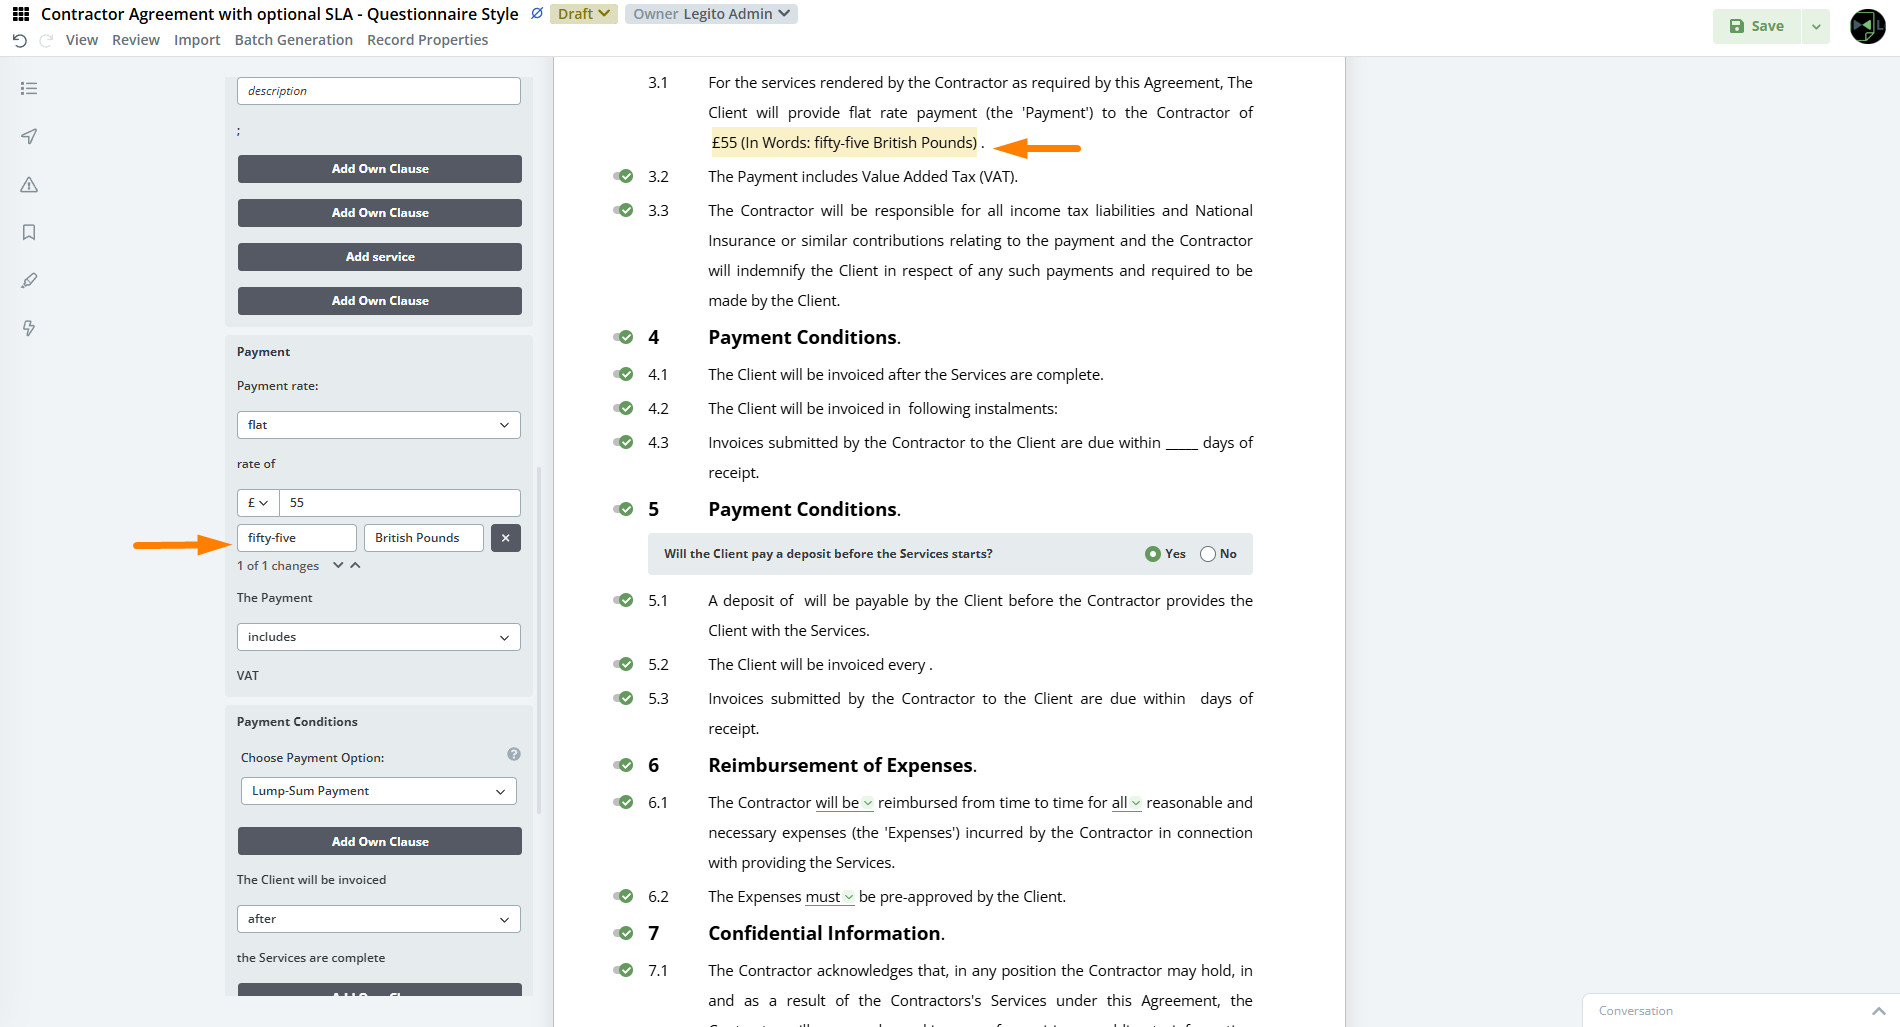
23) Automatic money in words transcription
The number value in the money element is not automatically transcribed into words after entering a value and clicking the money in words option. Transcription will take the selected language of the template into account.
24) Template Editor UX enhancements
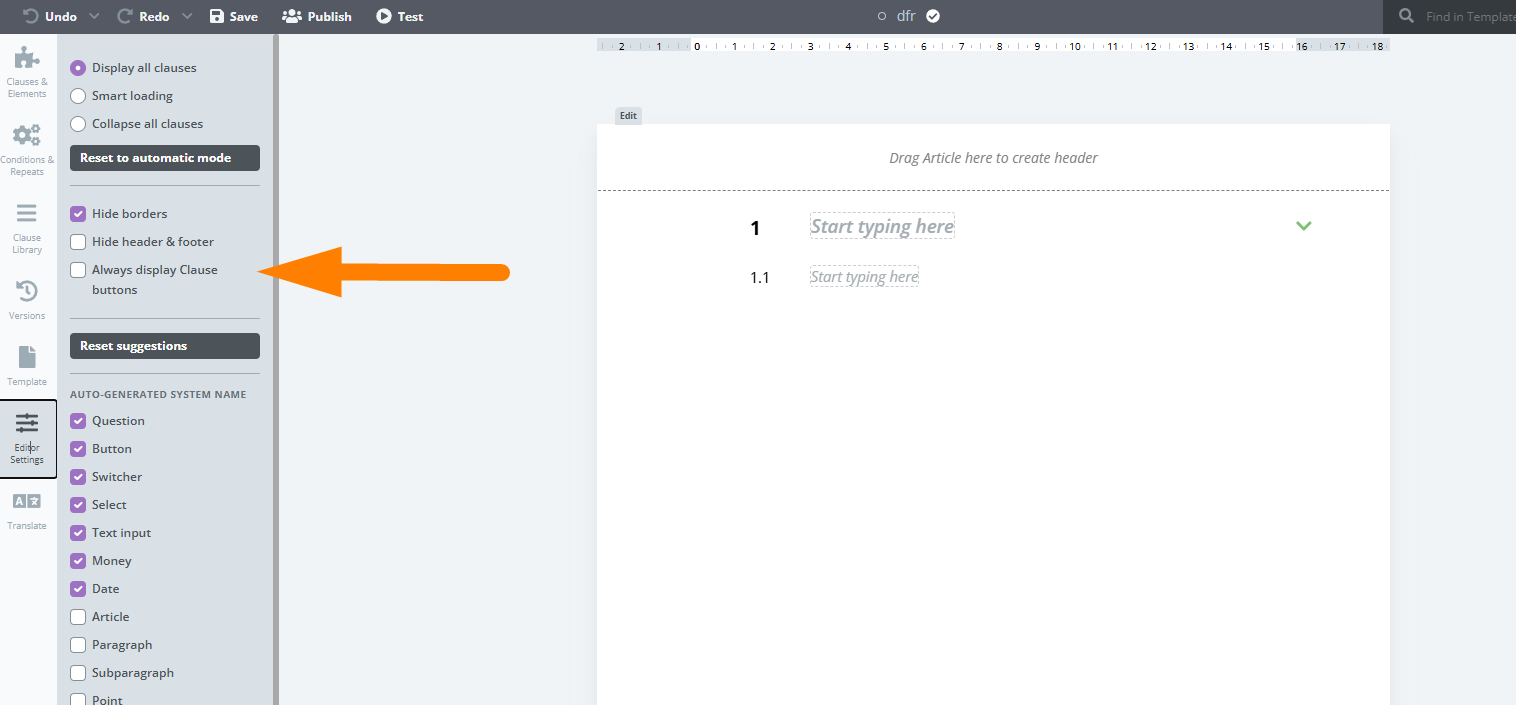
Several performance improvements have been made to the Template Editor. Scrolling through templates with smart loading enabled should feel much smoother. There shouldn’t be any more interrupts or template jumping. Larger templates in particular will benefit from this update.
A new option to show or hide clause control buttons has been added. This can be found in Template Editor > Editor Settings > checkbox: “Always display Clause buttons”. When turned off, clause buttons will only appear above the clause where the cursor is hovering. Checkbox: “Hide borders” have been reworked to function in a similar manner.
25) Document Editor UX enhancements
Design language has been enhanced and unified for notifications inside the Template Editor and Document Editor.

26) Number of changes in the latest Template version
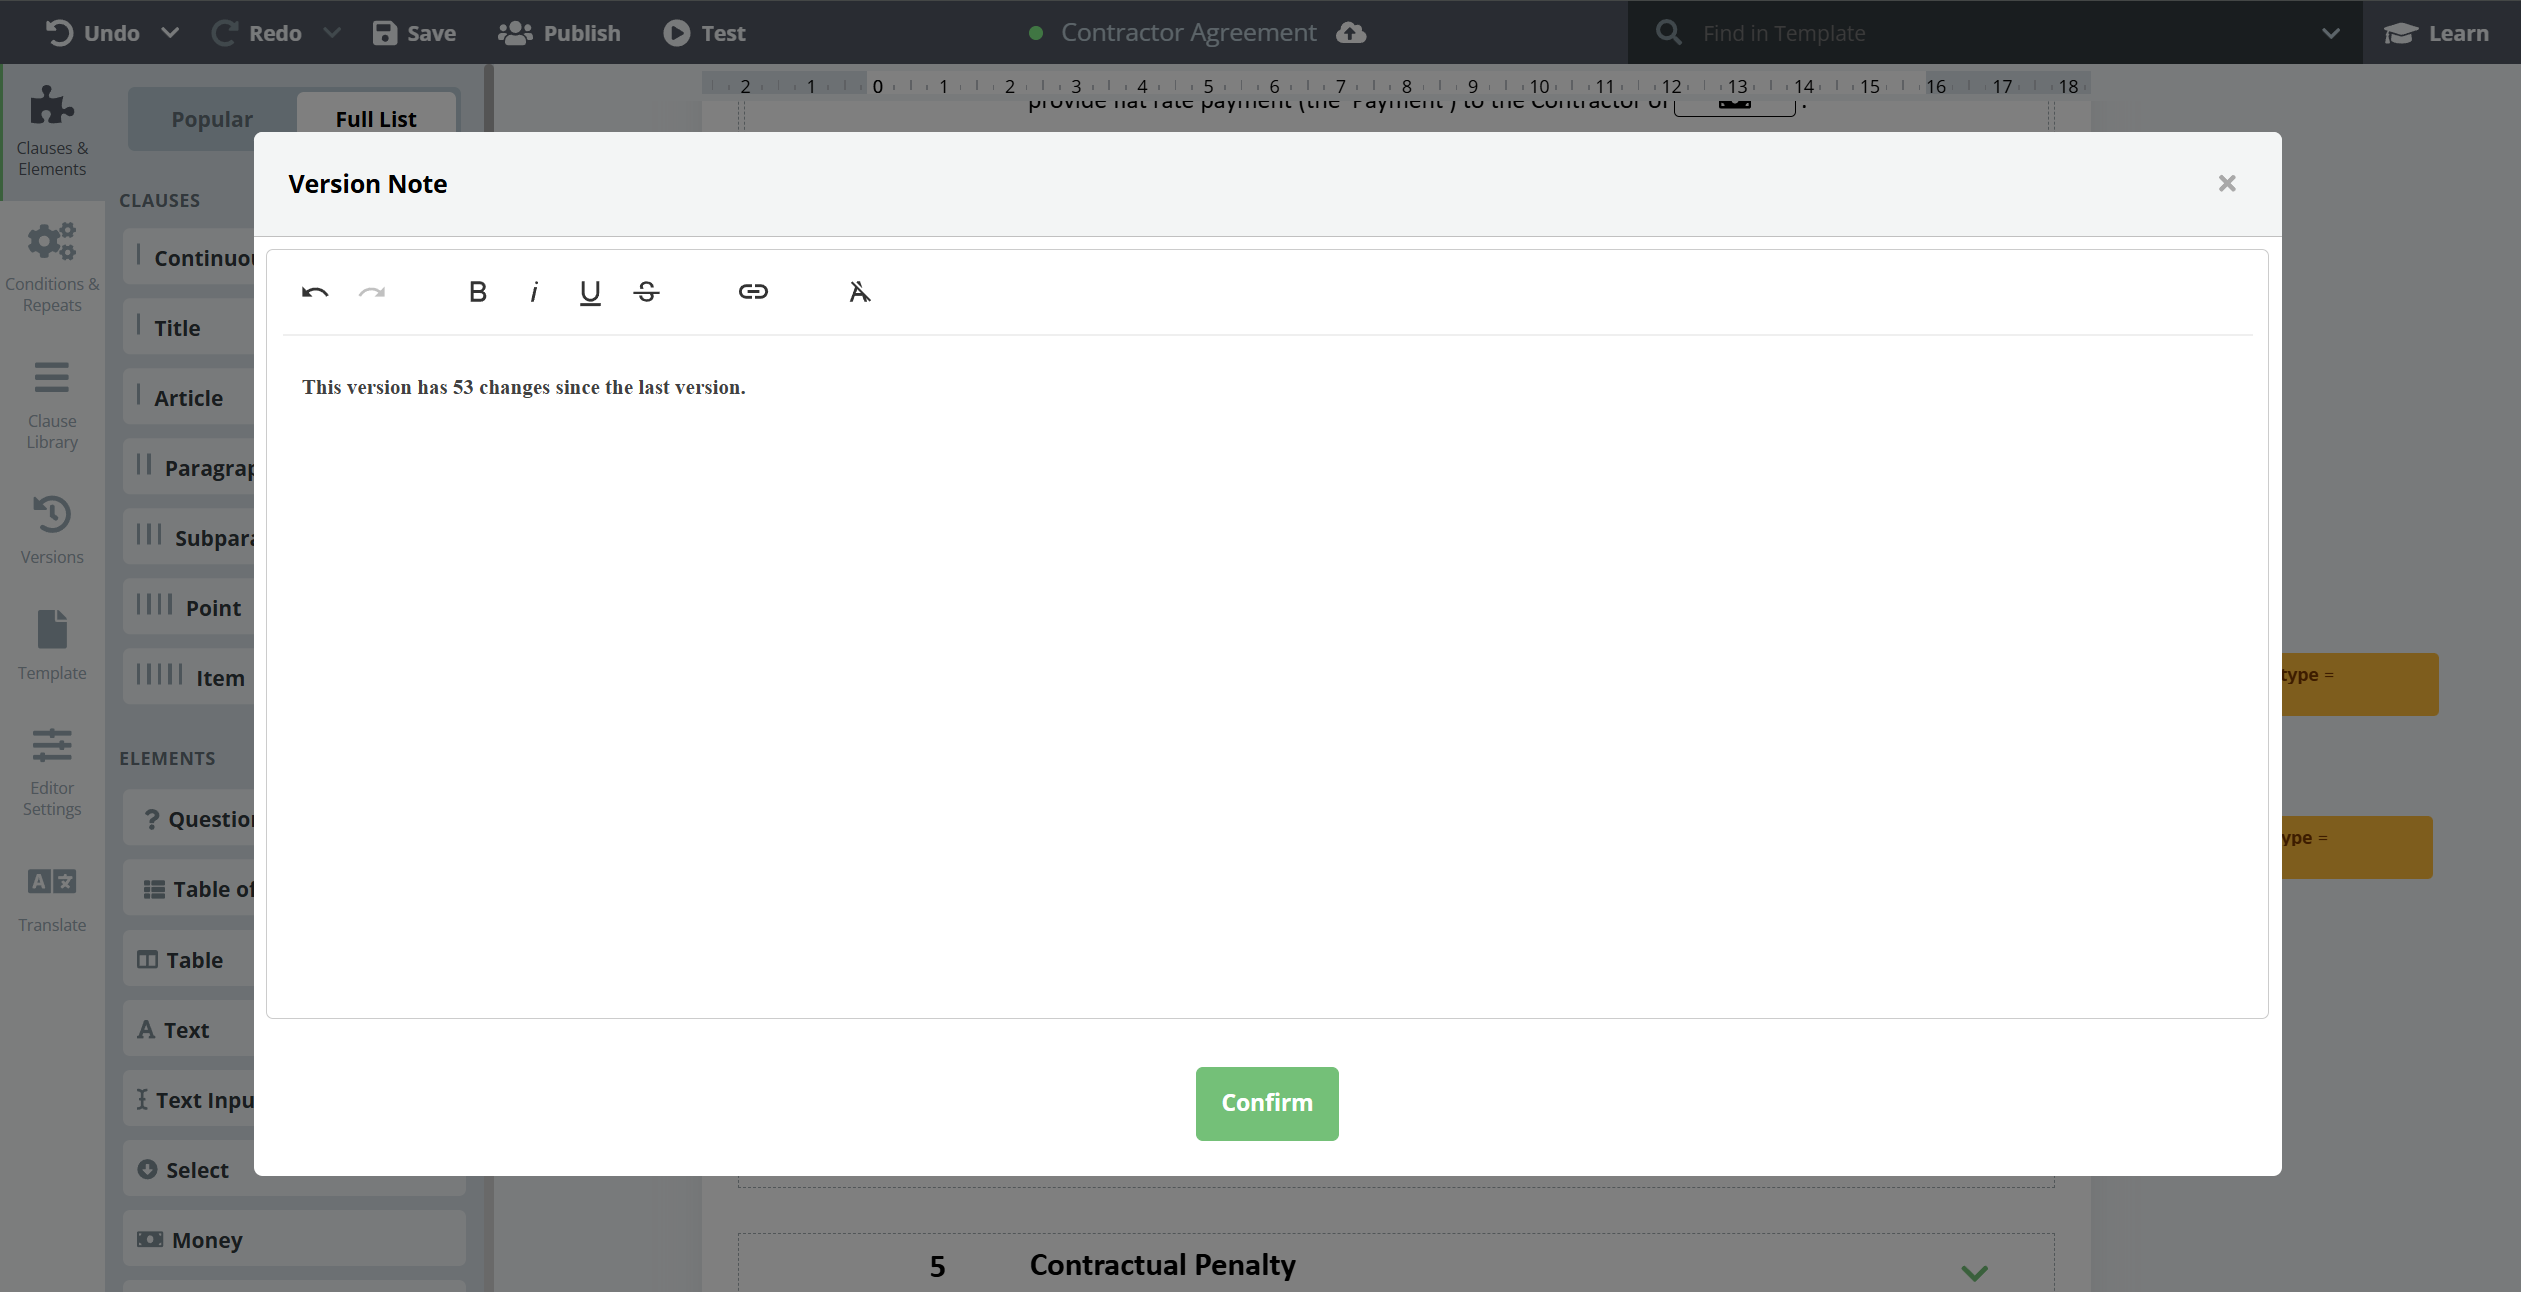
Recently introduced version notes in the Template Editor have been enhanced and expanded. This feature already allowed users to attach a custom note to each template version. This update automatically populates template version notes and the number of changes performed by the template author since the last saved/published version. It is the template author’s responsiblity to either keep this number in the note, or replace it with a custom message.
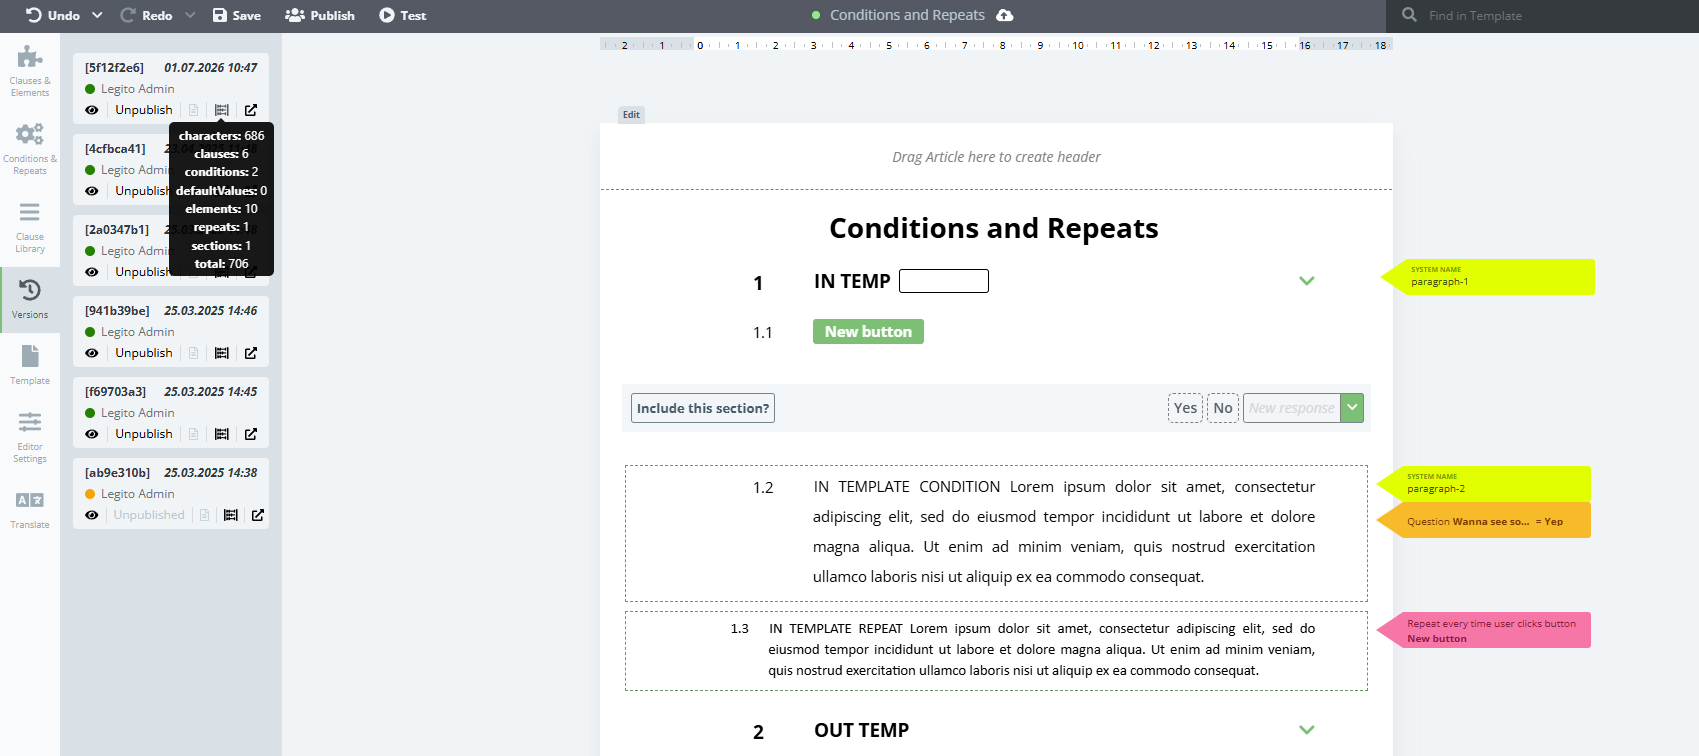
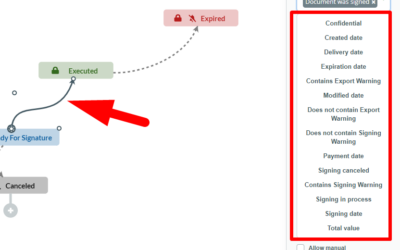
27) Number of elements in Template versions
Now there is an option to see the number of elements and other measurable template entities for each template version. Users can access this information by clicking on the new icon that can be found in Template Editor > Versions > eye icon on any template version. After clicking the icon, users are presented with a detailed count of the following data:
- Characters
- Elements
- Clauses
- Sections
- Conditions
- Repeats
- Default Values
- Total – sum of the things above
28) Calculating with Dates
The calculation element has been improved to allow working with dates. There are two ways this can be used. Firstly, inserting an equation where the result is a number of days, for example:
@date_element_A + @date_element_B = this will result in a number
Secondly, users can insert an equation where the result is a date, for example:
@date_element_C + 30 = this will result in a date
It is important to remember that calculations work with calendar days, not working days.

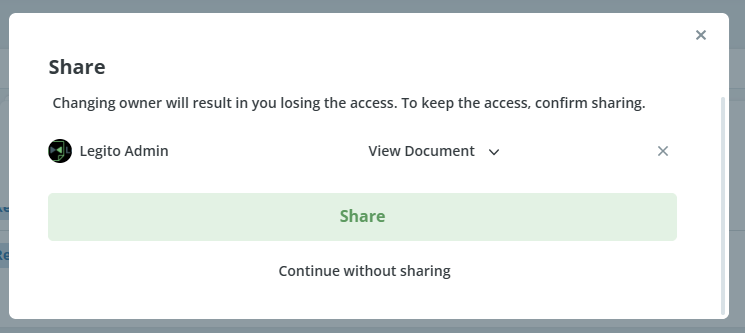
29) Optional sharing when owner is changed
Previously, changing the owner of the document could result in the loss of access to the document for the original owner if the document had not been shared with themself beforehand. To remedy this, the share modal appears automatically if there is a risk of access loss to the original owner. In the share modal, the original owner is pre-filled and notified about potential loss of access.
30) Multilevel Workspace Management
Multilevel workspace structure is now possible. One workspace can be designated as a Master Workspace to manage all subordinate workspaces and create new ones.
31) REST API Credits and Request Limits
Each workspace is now allocated a set number of REST API tokens for a given period. Once these tokens are used up, the REST API will return a message indicating that the token limit has been reached.
Token consumption is set individually for each REST API endpoint based on how resource-intensive it is to process. For example, exporting as a PDF consumes significantly more tokens than exporting as a docx, while other, lighter endpoints consume comparatively few. The number of REST API tokens available per period can be adjusted for each workspace directly in the workspace card in Manage Workspaces (available only through the master workspace of a given server).
Tokens are renewed on a per-minute basis.
Once a workspace runs out of tokens, a red flash message will appear at the top of the REST API Key section in Settings, informing the user that the REST API token limit has been reached and that the API is temporarily paused until the renewal date.
We have also added a new Logs tab to the REST API Key section, similar to the one already available for the Push API. This tab logs REST API requests and allows them to be exported to csv.
Q2 2026: Features, Features, Features
1) Permission- based Character-level formatting in Legito Documents
The character-level formatting feature introduced in Q1 2026 has been expanded. Up until now, users could set character-level formatting in the Template Editor then display it in the Document Editor. Now, users can perform character-level formatting for text input and text elements directly in the Document Editor. A standard set of formatting options is available with the following formatting settings:
- Bold
- Italic
- Underline
- Strike
- Text color
- Highlight color
Document Editor formatting is permissions based so that template authors can specify beforehand what kind of formatting settings should be allowed for a specific element. For example, some elements are only allowed to be in bold or italics. This setting can be found in Template editor > Properties > Lock Formatting.
The formatting process is very straightforward. Users with permission to “Unlock Document Text and add Clauses” can doubleclick the element to unlock it. Selecting any part of the text triggers the formatting panel to appear. Finally, users can select and apply their desired formatting.
2) Update translations of older Template Versions
Updating translations of previous template versions without creating a new Template Suite version can be achieved by clicking the new “Update Translation” button, which is available for any outdated template version. Similarly, opening a document record based on an older template version presents the option to update the document if an updated translation is available.
![]()
![]()
3) New out-of-office and delegation settings
Users can now mark themselves as “out of office” and select another user to be delegated as a temporary stand-in. Delegated users will have all the privileges of the original user, which means they will be able to see all of their documents.Delegated users will also be able to stand in for the original user’s duties, such as review or approvals. The delegated user is easily identified by a special icon beside their name. All actions performed by delegated users are recorded in the timeline as standard. The timeline will also display which actions were performed by a delegated user.
To control who can use the new delegation feature, there is a new “Can Delegate” permission. This can be found in People > User > Workspace Settings > Can Delegate.
4) Option to sign files other than PDF
Uploaded files can now be signed not just in PDF, but in several other formats by converting these files to PDF first. Any uploaded attachment that can be converted to PDF can be signed just as easily as any other native Legito document.
List of currently supported file types:
- docx
- doc
- rtf
- txt
- odt
- ods
- xlsx
- xls
5) New API version – API v8
We are in the final phases of refining the new REST API version 8. This version will rework some old endpoints and implement several new ones. Many of these changes were created thanks to great suggestions from our customers.
New functionality:
- Ability to perform CRUD via JSON Integration
- Running an AI agent via API
- LegitoSign electronic signatures
- Full-text search on records
- Reworked Document Version data model
- New Template Suite capabilities
- Create a Template Suite by importing a docx file
- List all fillable elements of a Template Suite’s latest published version
- New file management endpoints
- Labels can now be updated
- Workflow improvements
- Much richer Event filtering
- User out-of-office delegation
- Object Records expose their workflow stage
- All new user permissions
6) Better labels
The labels property has been enhanced to enable the addition of labels for either one, or both Legito document records and uploaded files. Labels can be customized upon creation, or afterwards by clicking on the hamburger button on the label.
7) Deeper integration with Adobe Sign
Legito’s Adobe Sign integration has been enhanced by introducing support for expiration date and Adobe approvers.
Firstly – an option has been added to insert the expiration date for the eSignature process. The expiration date field is optional, and can be enabled in the same signing modal where recipients are added. If the field is enabled but a date is not specified, the system automatically sets the expiration date to 120 days from that date. There is also an option to have the date filled out automatically based on the document. Where there is a Date Element with a “Signing Date” tag applied to it, the system will automatically take this value and set it as the expiration date.
Secondly- Legito now supports Adobe approvers, so the system can see participants in the selected Adobe workflows and forward them to Adobe when the signing process has started.
8) Document record actions triggered by workflow stage change
Document record actions can now be tied to Workflow stage changes. This means that a predetermined action (or actions) automatically triggers whenever a Workflow stage changes. Actions can be set up in the Workflow Editor by clicking on the arrow between stages (stage change).
The following actions are supported in this feature’s current beta version:
- archivation – archives the document record
- restoration – restores of the document record from the archive
- purge – permanently deletes the document record
- anonymize – anonymizes the document record
- Owner change – changes the owner of the document record (it is possible to pick a specific user)
- unshare – unshares the document record.
More actions can now be selected for a single stage change. If the user chooses the option to unshare the document record, these additional options are available:
- Users – unshares specific user/users
- User groups – unshares specific user group/groups
- Properties – unshare users from specific sharable properties
- Unshare all users and user groups – broad unshare option that unshares the document record from all users and user groups
- Unshare all shareable links – deactivates all external share links
- Users can select and combine multiple unshare options.
- Finally, all document record actions will trigger for both manual and automatic stage changes.
9) MCP Server
A range of new AI features have been implemented. All of these AI features are powered by the industry standard Model Context Protocol (MCP). MCP works by connecting a large language model to Legito’s internal API so it can understand and act on requests across documents, templates, and workflows.
10) Kedy AI
Introducing Legito’s new AI Assistant, Kedy AI. By simply chatting with Kedy, users can control most of the functionality that Legito offers using natural language. Kedy AI can be found in the main menu at the top of the page.
Kedy AI can now perform these actions:
- Document creation from templates
- Perform search in Documents and use filters
- Creation of a new template from uploaded files
- Document management actions such as sharing, archivation, deletion or owner change
- Change workflow stages or show available workflow stages for given document
- Offer download links for requested documents
- Fill out documents based on the template instructions (elements have a special AI field for exactly this purpose)
- Offer more guidance by providing links to our knowledge base
- Provide data insights
- Fill out metadata such as document record properties
- Manipulate with Object records – create, delete, change owner, change wf stage etc.
In the case of unclear requests, KedyAI will ask for clarification or confirmation, in the same way as other mainstream AI agents.
11) AI Agents
Kedy AI already supports agentic workflows, meaning users can create agents to perform assigned tasks at predetermined times. Tasks can also be run manually. Agents can be accessed via Kedy AI and switching to the Agents tab in the left panel.
12) Kedy AI Dashboard Widget
Kedy AI can be accessed from a newly added widget. The widget can be added to the dashboard the standard way by clicking “Customize Dashboard” and selecting the “Kedy AI” widget. The widget functions as a chat box where you can task Kedy AI directly. After entering the request, the user is redirected to the standard Kedy AI interface.
13) Kedy AI Token Allocation and Quotas
Introducing the new Kedy AI Token System. Each Workspace is allocated a dedicated volume of AI tokens for a specific period. Tokens power all native AI-driven tasks within your environment.
Tokens are managed at Workspace level and will automatically reset on a monthly basis.
- Existing Clients (Loyalty Bonus): To thank you for being a valued customer, your Legito Workspace will start with an allocation of 2 million AI tokens.
- New Workspaces: All newly created workspaces will receive a standard default allocation of 1 million AI tokens per month.
Tokens are deducted when a request utilizes Legito’s dedicated Kedy AI servers. If you use advanced setups like MCP (Model Context Protocol) where the AI engine runs outside Legito’s server infrastructure, no tokens are spent,with one important exception noted below.
| Feature / Tool | Consumes Tokens? | Details |
| Kedy AI Chat | Yes | Standard chat queries, interactive prompting, and contextual discussions run through our core AI server. |
| AI Agents | Yes | Automated background agents performing multi-step actions require server processing power. |
| Word-to-Template Conversion | Yes (Always) | Converting regular Word documents into reusable templates inherently relies on our custom backend parser and AI servers. Note: This tool always consumes tokens, even if initiated via MCP. |
| MCP Integration (General) | No | If you trigger custom tool actions via MCP that bypass our central AI processing server, no tokens are consumed. |
If your allocated AI tokens are used up before the end of the month, any active AI requests are temporarily paused. During this time, the chat will stop responding, agents will not execute, and the Word-to-Template converter will be unavailable.
To keep you clearly informed, a prominent red notification banner will appear at the top of your Kedy AI section, displaying the following message:
⚠️ AI token limit reached. Kedy AI is temporarily paused and will resume once AI tokens are renewed next month.
When the new monthly period begins, Workspace tokens will automatically renew to full capacity, and all features will instantly resume operation.
14) Kedy AI User Permissions
To give you granular control, we have added a new AI Permissions Section inside the People module.
- What it does: Toggling the checkbox delegates whether a specific user can view/use the Kedy AI section and see the Kedy AI dashboard widget.
- Default behavior: To ensure a smooth transition, whenever Kedy AI is enabled in a workspace, the user checkbox default setting is ON for everyone. This can be turned OFF manually for specific users when required.
- API Support: The Kedy AI user permission is fully integrated into API v8 for automated user provisioning.
15) New Permissions for MCP Integration
A dedicated permission to control MCP Integrations to the aforementioned AI section has been added. By default, a user’s MCP Integration permission is automatically enabled upon activation of the MCP Integration in the Workspace in Manage Workspaces. If the MCP Integration is not enabled in the Workspace, permissions will be unavailable to users and will remain off. Once user permission is enabled, the user can integrate their account with third-party applications via the Workspace MCP.
16) Enhanced AI conversion from Word to Template
Word to Template AI conversion has been enhanced. Conversion is executed by our in-house model which is continuously trained on more data. As such, this feature will evolve to become more powerful and robust.
17) New Files View for Manage Documents
Introducing a completely new layout option for visualizing document records in the Manage Documents section. The new layout displays each document record as a small tile,and a thumbnail generated from the first exportable document in the Template Suite. It can be selected by clicking on the new icon next to the grid and kanban options.
18) Files view Dashboard Widget
The aforementioned Files View is also available for the new Document records dashboard widget.
19) Customizable Document Name Column
There are several new options on how to customize layout in the Manage Document section. Firstly, new customizations are available for the Document Name Column. Clicking on “Customize Content” for this column allows the user to select what information is included.
The following options are available:
- Warnings
- Empty indicators
- Unresolved comments
- Labels
20) Customizable actions in Manage Documents
Editing the farthest right column with the buttons is now possible. One change that users will immediately notice is there are now up to 4 available buttons – 3 of which are optional. Each button can be individually customized with the following available options:
- Open
- Download, Signature or Approval
- Email, Signature or Approval
- Approval or Signature
- Edit
- Download
- Approval
- Sign
- Share
- Detail
Another notable change is the new “Open” button that effectively replaces the View and Edit buttons. The Edit button is still available, but only to edit document records for uploaded files.
New approval button.
Buttons have two variants – large with text, and small with icons only.
All buttons are dynamic – reflecting available options for a given Document Record.
This also works for other layouts.
21) Configurable Anonymize, Archive and Delete Buttons
The action buttons to anonymize, archive, and delete document records in the Manage Documents section are now optional and are individually configurable for each stage. There are 3 new dedicated checkboxes for each button that can be found by clicking on a workflow stage in the Workflow Editor.
22) Changing the level of User-added clauses
Changing the level of a User-added clause in Document Editor is now possible by clicking on the new icon found to the left of the User-added clause.
23) Automatic money in words transcription
The number value in the money element is not automatically transcribed into words after entering a value and clicking the money in words option. Transcription will take the selected language of the template into account.
24) Template Editor UX enhancements
Several performance improvements have been made to the Template Editor. Scrolling through templates with smart loading enabled should feel much smoother. There shouldn’t be any more interrupts or template jumping. Larger templates in particular will benefit from this update.
A new option to show or hide clause control buttons has been added. This can be found in Template Editor > Editor Settings > checkbox: “Always display Clause buttons”. When turned off, clause buttons will only appear above the clause where the cursor is hovering. Checkbox: “Hide borders” have been reworked to function in a similar manner.
25) Document Editor UX enhancements
Design language has been enhanced and unified for notifications inside the Template Editor and Document Editor.
26) Number of changes in the latest Template version
Recently introduced version notes in the Template Editor have been enhanced and expanded. This feature already allowed users to attach a custom note to each template version. This update automatically populates template version notes and the number of changes performed by the template author since the last saved/published version. It is the template author’s responsiblity to either keep this number in the note, or replace it with a custom message.
27) Number of elements in Template versions
Now there is an option to see the number of elements and other measurable template entities for each template version. Users can access this information by clicking on the new icon that can be found in Template Editor > Versions > eye icon on any template version. After clicking the icon, users are presented with a detailed count of the following data:
- Characters
- Elements
- Clauses
- Sections
- Conditions
- Repeats
- Default Values
- Total – sum of the things above
28) Calculating with Dates
The calculation element has been improved to allow working with dates. There are two ways this can be used. Firstly, inserting an equation where the result is a number of days, for example:
@date_element_A + @date_element_B = this will result in a number
Secondly, users can insert an equation where the result is a date, for example:
@date_element_C + 30 = this will result in a date
It is important to remember that calculations work with calendar days, not working days.
29) Optional sharing when owner is changed
Previously, changing the owner of the document could result in the loss of access to the document for the original owner if the document had not been shared with themself beforehand. To remedy this, the share modal appears automatically if there is a risk of access loss to the original owner. In the share modal, the original owner is pre-filled and notified about potential loss of access.
30) Multilevel Workspace Management
Multilevel workspace structure is now possible. One workspace can be designated as a Master Workspace to manage all subordinate workspaces and create new ones.
31) REST API Credits and Request Limits
Each workspace is now allocated a set number of REST API tokens for a given period. Once these tokens are used up, the REST API will return a message indicating that the token limit has been reached.
Token consumption is set individually for each REST API endpoint based on how resource-intensive it is to process. For example, exporting as a PDF consumes significantly more tokens than exporting as a docx, while other, lighter endpoints consume comparatively few. The number of REST API tokens available per period can be adjusted for each workspace directly in the workspace card in Manage Workspaces (available only through the master workspace of a given server).
Tokens are renewed on a per-minute basis.
Once a workspace runs out of tokens, a red flash message will appear at the top of the REST API Key section in Settings, informing the user that the REST API token limit has been reached and that the API is temporarily paused until the renewal date.
We have also added a new Logs tab to the REST API Key section, similar to the one already available for the Push API. This tab logs REST API requests and allows them to be exported to csv.
More From New Releases
Q2 2026: Features, Features, Features
Discover 31 new Legito features, including Kedy AI features and smarter workflows to boost document automation.
...
Q1 2026: Twenty New Features, AI Included
Discover 20 new Legito features, including AI-powered Word conversion and smarter workflows to boost document automation.
...
Q4 2025: New Permissions and Triggers
Q4 2025: Data Insights and other improvements to enhance automation, security, and document management in Legito.
...
Q2 2025: Data Insights and 11 other Improvements
Q2 2025: Data Insights and 11 other improvements to enhance automation, security and document management in Legito.
...
Q1 2025: AI for CLM and more
Discover what’s new in the Q1 2025: AI for CLM and other enhancements to make your document management faster and more efficient.
...
Q4 2024: Document Automation and Signatures
Discover new and improved Legito features in the Q4 2024 report: Document Automation and Signatures. More efficient automation and signatures!
...
Q3 2024: Next Generation Document Editor
Reflecting on a productive first quarter in 2024, we are delighted to announce the release of our latest features.
...
Q2 2024: Focus on CLM and Integrations
Reflecting on a productive first quarter in 2024, we are delighted to announce the release of our latest features.
...
Q1 2024: New Integrations, Search & Document Automation Features
Reflecting on a productive first quarter in 2024, we are delighted to announce the release of our latest features.
...
December 2023: Salesforce Integration And More
In our most recent release, our team launched a Legito app in Salesforce that supports all endpoints contained in Legito’s robust REST API. Addit...
November 2023: Zapier Integration & Dashboard Improvements
We redesigned the default Dashboard for newly created Workspaces. The new Dashboard design is based on your feedback and has been applied to the Wi...
October 2023 Release: Easier Forms Building And More
To allow our power users to quickly and easily build simple Form Templates in the Template Editor, we added a Quick Actions bar with pre-built bloc...
September 2023 Release: Localization & Template Editor Improvements
Discover new localization settings for workspace and other template editor improvements. Workspace admins can set formats of dates, numbers, and fi...
August 2023 Release: New Features for Power Users
Our latest release introduces Automatic Field Creation for Legito Sign and DocuSign within Legito Templates. And much more.
...
July 2023 Release: Enhanced Legito Sign & Free Workspace
As a Legito gesture to provide value to the Legito community, and to support new entrepreneurs, Legito offers a Free plan that provides access to s...
June 2023 Release: Processing PDF Forms
Legito can now process and automatically fill PDF documents using data inserted to your Legito Documents or Forms. To add a PDF Template to your Te...
May 2023 Release: Process Management Improvements
Now you can upload files to Object Records the same way as Document Records. We added a feature that allows the activation of Saved Files Property ...
April 2023 Release: UX & Integration Tools Improvements
We made several improvements in April, which led to a smoother and more enjoyable user experience. Keeping up with the latest advancements in UX an...
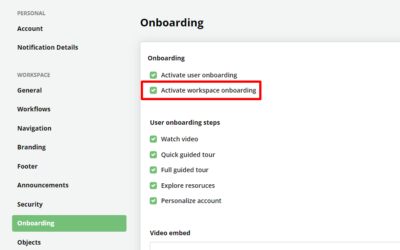
March 2023 Release: User Onboarding And More
In addition to Workspace Onboarding, we have released a simplified User Onboarding for non-Admin users. Workspace Onboarding will teach your power ...
February 2023 Release: Onboarding 2.0
We love our power users, so we built a brand new comprehensive onboarding for Workspace Administrators to help them understand each Legito componen...